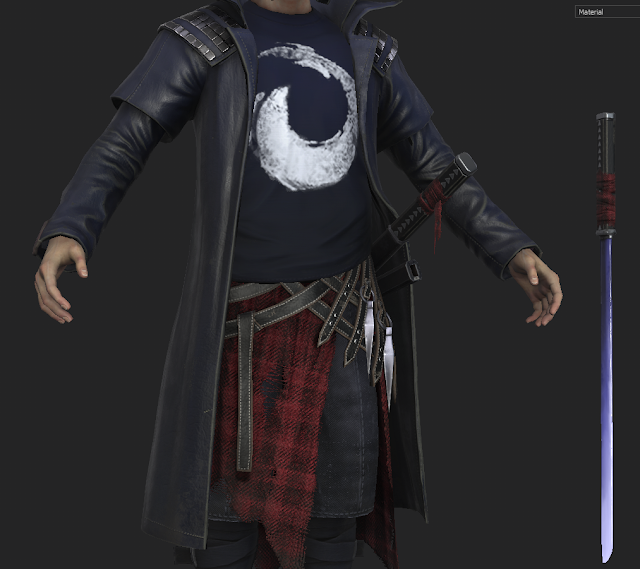
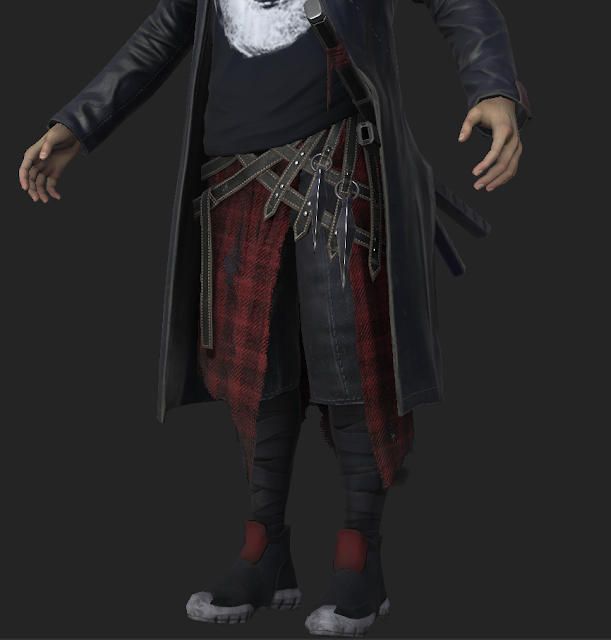
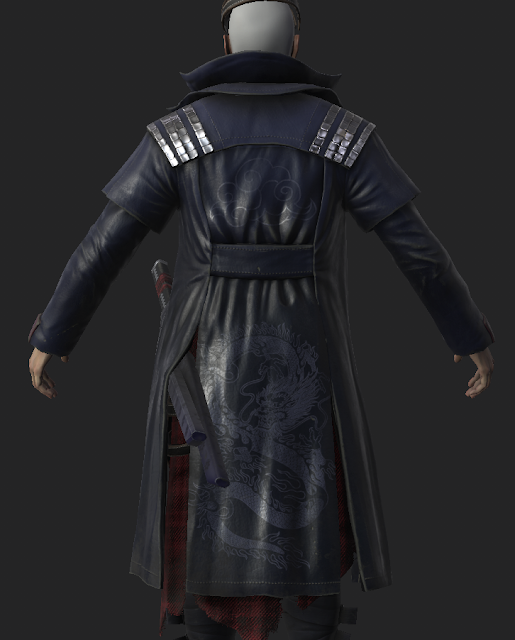
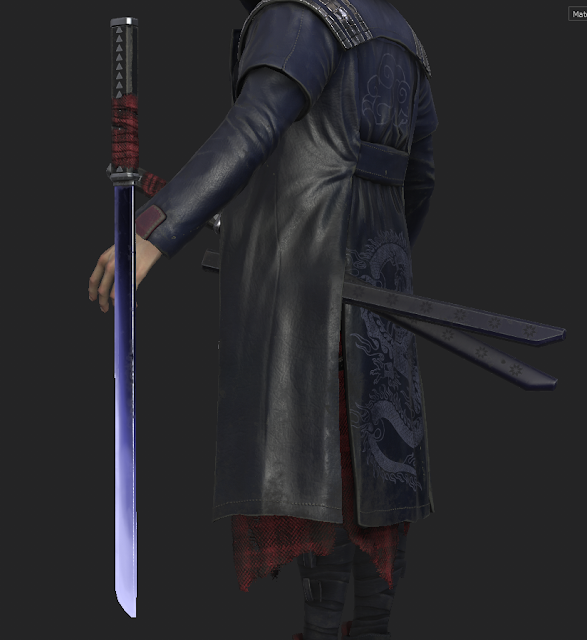
Also, after getting feedback I went back to the low poly model and modified the eyes, as they were to open and the character had a weird expression. Thinking about how to give more personality to the character, I added some smudged eye make-up, because I felt like it matched the character's mood and outfit and also made the eyes have slightly different colors, but I kept it quite subtle because I wanted it to be a small detail, rather than a main feature. I painted the area on the head where the hair is supposed the be the same color as the hair, just to make sure it wouldn't be noticeable through the hair cards.
I kept the t-shirt quite simple, and only added some color variation to it, stitches around the edges and the pattern it had in the concept. Even though, the t-shirt is supposed to be black, I tried playing with some dark, desaturated colors a little to make it more interesting than just having it flat black and added a blue gradient from the top, to bring the attention to the upper part of the torso.
I created an alpha map for the cloth around his waist and looked up some tutorials on making torn fabric in Substance Painter. I ended up making in in three simple steps, the first one was going over all the edges with an artistic brush so there wouldn't be any sharp, straight edges left and also made some holes in the fabric; next step was going over everything again, but this time with a grid brush which would suggest the fabric weaves, and lastly, I painted more fly-away strands with the basic hard brush. I think this method gave me a pretty nice result. After getting more feedback, I realised that the piece of cloth was looking too flat, so I painted more folds on multiple height layers with different intensities and also toned down the saturation because it was drawing the attention too much.
For his belts, I added some stitches and a light brown color on the edges, looking at some real life belts references. I wanted to make the wraps on his legs some stretchy, sport fabric and his shoes some kind of running sneakers without laces, from a breathable fabric. Also, I toned down the white part of the shoes quite a lot because it was too bright and drawing too much unwanted attention.
I spent quite a bit more time working on the coat because it is a big part of the character. I looked up at many types of leather coats to see what details I could add to it and where to place the stitches. I added some desaturated, light brown wear around the edges which I think helped with the realism, also added some light damage to it. On the shoulder and neck area I added a light blue gradient so it would draw the attention towards the head of the character. On the back of the coat, I added a dragon pattern and a Japanese style inspired cloud pattern. Even though, they were not in the concept, I think it still matches the samurai inspired theme of the character and it would be a nice detail. Still, I wanted to keep it subtle so I only made them a slightly different color and made the biggest change in the roughness. Also, I added those thinking about Sunset Overdrive, which is a third-person game and the character would be mainly seen from the back, so having some details there would make it more interesting to look at.
When working on the weapons, I first made a standard metal material for them and made them look like regular weapons, then I added an emissive map to imitate the look the katana has in the concept which I think it's really interesting. For the handle, I tried suggesting the look a traditional katana's handle has, this is why I added the metal triangular shapes over the leather covered handle, which also matched quite well the concept. Also, I realised I forgot to add the wraps the katana's have on the handle in the concept, so I added them directly in Substance, making them the same material like the cloth on his waist and painting the folds with height layers, only went back to 3ds Max to add a plane for a hanging piece of fabric for the sheathed sword. I didn't add a hanging piece for the other katana because he would hold it in his hand so it would probably only get in the way. The sheath I kept quite simple and only made a color gradient from the bottom and added some cherry tree flower pattern, to keep the theme of the character.
Overall, I didn't want to add too much wear and damage to the character so I kept it more subtle, only visible in certain places which would make sense to be worn. At the end I went back and added dirt layers, trying to keep them more intense in the lower part of the character. Also, I made another layer to reinforce the AO Map and then manualy painted on top of it to get nicer transitions between the materials, for example, between the face and the mask, the coat and the t-shirt, the coat and the hands, the belts and the pants and the wraps on his legs.
This is how the final textures turned out, after this stage I only made small tweaks after setting up the lighting in Marmoset Toolbag. Overall, I am pleased with how the materials turned out and I am happy I got to learn a lot from working on this character. Now my main focus is the hair which needs a lot more work before being done.
The textures took me roughly 3 days to get to this stage.


No comments:
Post a Comment