Showing posts with label Hidatsa Character. Show all posts

Sunday, 5 January 2020

Hidatsa Character -Update

Applying the feedback that I got for this project, I went back and packaged the textures a bit better, so I had the metalness and roughness map in one texture. Also, I checked the textures again and made some slight tweaks, especially for the hair. I changed the material settings for the hair in Marmoset, and worked a bit more on the texture for the hair strands and made the more subtle, as I thought that they were too obvious and I wanted them to blend in the hair mesh, rather than stand out on top of it. I made some slight changes to the lighting as well, toned down the colours and the intensity a little bit and changed some angles.
Overall, I am quite pleased with this character and I feel like I managed to improve a little bit from my previous one, but for the FMP I need to take a bigger step forward and improve all parts of the process, the sculpt, retopology, texture, hair and presentation.


Sunday, 8 December 2019

Hidatsa Character - Presentation & Hand-in

After I finished rigging the character and the pose, I imported everything into Marmoset Toolbag and set up the final lighting. I still find this part quite difficult and it takes me a lot of experimentation to find the right balance between interesting lighting and showing off my textures. I've looking a lot at how other people set up their lighting and I found some really good process breakdowns on Marmoset's website which really helped me a lot. I wanted to try something different for this character, and instead of heaving the main light illuminating the side of the character which is facing the camera, have it on the other side. I think this gave me some really nice shadows on her face and body but I feel like some parts are too dark and it doesn't quite show all the details on the materials. I tried compensating this with some fill lights and rim lights which colored my shadows a little, but I think I'll still have to adjust the intensities a bit. Also, I'd like to find a way to have some lights reflect in the eyes a little more, so the character wouldn't look so dead.
For now, I am quite happy that I managed to finish everything that I wanted before the hand-in and even though there are more adjustments I need to make, I want to take a break from this character, wait for feedback and then come back with fresh eyes to finish it.


Saturday, 7 December 2019

Hidatsa Character - Rig & pose

I rigged the character in 3ds Max using the biped. I kept it very simple so I could finish it in time for the hand in so only added some more bones for the hanging pieces of clothing and the props. The most difficult part was to not get any clipping, as I have multiple layers of clothing but I managed to get it to look fine in the pose of my character. Skinning took the most time of the process as usual, and it's far from perfect but I was only focused to make it look good in the pose that I am making because I didn't have time for anything else before the deadline and I will need to go back and adjust it a little more.
I had some trouble deciding on the pose of the character, as I didn't want to make something very dynamic, like her drawing the bow, but didn't want to have it very static and stiff either. I looked up some archery poses to get some inspiration and tried out a few poses until I got something that I was fine with. I still think that the pose is still quite stiff but I don't have time for more adjustments at this point, as I've got one more day until the deadline and I still have to set up the lighting in Marmoset Toolbag and I want to add some hair cards as well.


After I set up the Marmoset scene I cam back to add some hair cards. At first I wanted to cover the whole head with them but I thought that the hair mesh was looking quite decent on it's own, and covering the whole head and braids would take a lot of time and it would probably make me go over the budget as well, I decided to only add a few thin strands to make some variation.  I hand painted some simple hair strands in Photoshop, made 3 types of long strands for the head and 3 types of very short ones to add on the braids. Also, made some eyelashes and eyebrows. Spent the last day before the hand in placing them on the head but I had to rush a little so it's not looking that great yet. I am planning to go back and change them a little, and maybe add some more fly aways. I am glad that I didn't go over the budget with them, the entire character with the props and hair should be around 23k tris, so I still have some tris to spare to adjust the hair. 


Hidatsa Character - Textures 2

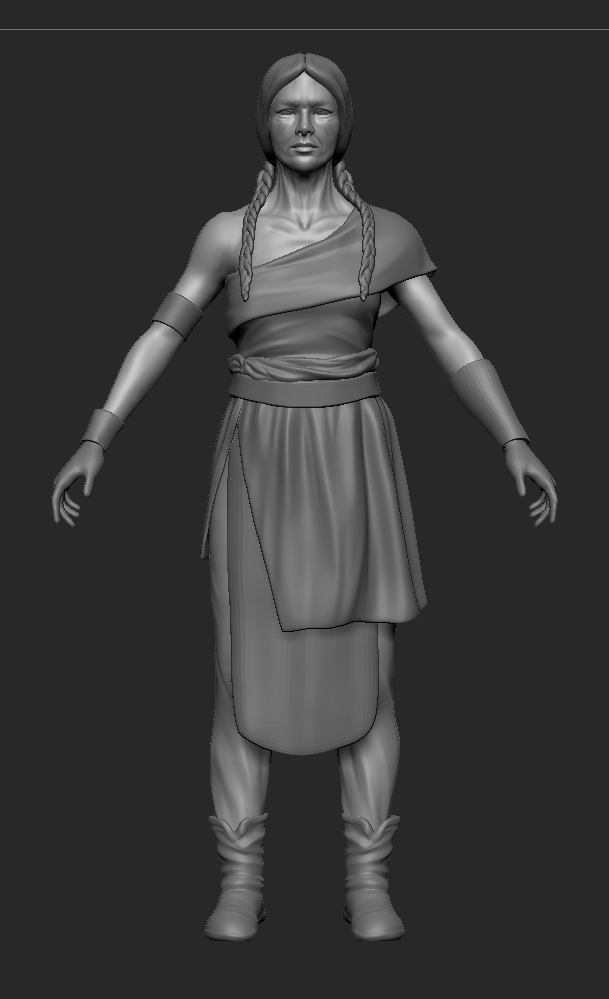
Next day, I went over all the materials again and added more definition to them. I tried stopping myself from adding wear and dirt for now so I could have some nice bases to work on. At this point everything was still looking quite generic but I am quite happy with the variations I got from just the bases. Also, after getting some feedback I tweaked some of the colors, like the saturated red on her belt because it was drawing too much attention.


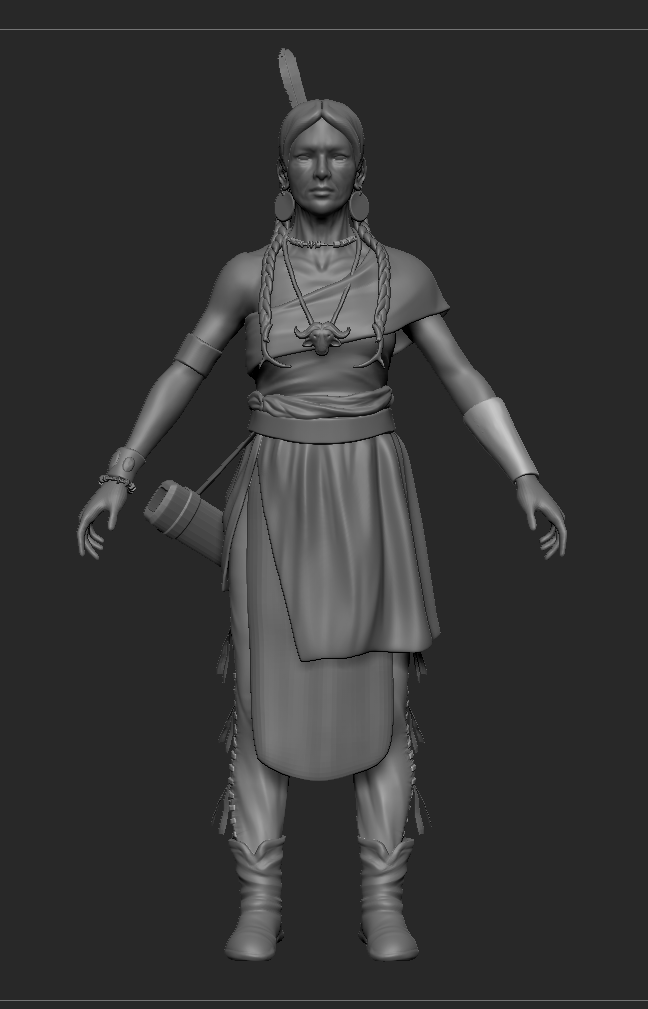
For the patterns that I added on the clothing, I tried to replicate some native american motifs. I knew that all the patterns have a particular meaning in their culture and tried to keep that in mind when adding them, but it isn't completely historically accurate. The symbols on her dress, armguard, bracelets and accessories are taken from resources I could find online and I tried keeping them relevant in away to the theme of this character, so most of them would symbolise something like a life journey for freedom and happiness, encountering difficulties and heading towards a future goal while keeping in touch with a past home. Everything is very rough but those were main meaning of the symbols that I added, even though the story would be a bit of a stretch. Also, for the face paint I wanted to keep it really simple, as I thought that covering her face too much wouldn't look that good. The only thing that I added were red paint where her hair parts, which I read was a common thing native american women would do and it was just something considered aesthetically beautiful (like make up for modern women), the red line on her chin which is more warrior like and white dots near her eyes, again just for the aesthetic. 
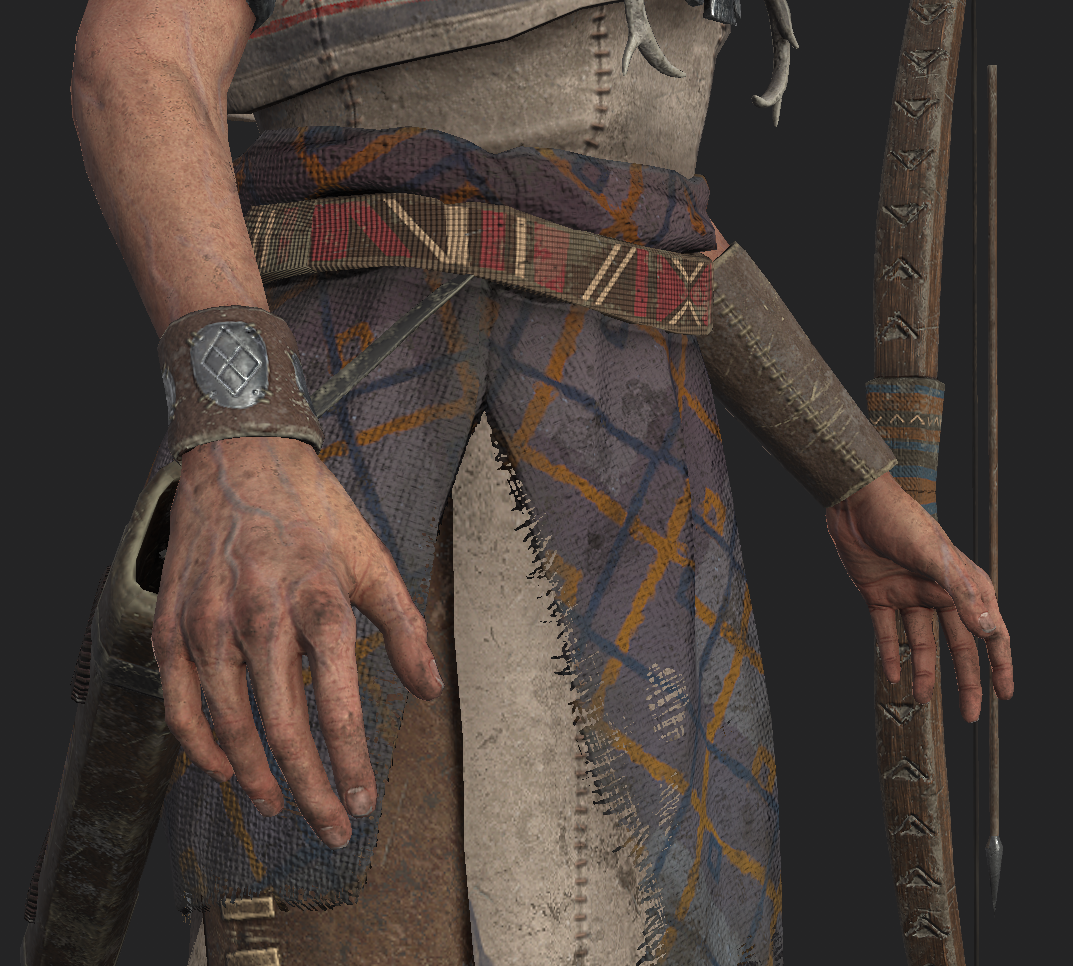
Now that I had all the bases in place, I could move on and add wear to her clothes. I went over all the materials again and added things like, dirt, scratches, edge wear, stains, material discoloration and such. I had all of those on multiple layers which I stacked together to get the effect that I wanted. Also, added more details with a height map to the materials, to refine the material texture better. 


Also, I added some dirt to her skin as well, as I though that it would make sense that some areas wouldn't be completely clean, like her hands for example. At the end, I added a sharpening filter over all the materials, to get the details to show a little better, and a fill layer to reinforce the AO map, then went on and hand painted the transition between the materials where the AO wasn't showing enough.


For the quiver I looked up some native american designs to try and make it more interesting, and added a fabric pattern and some dream catchers, on which I will add more feathers and hanging pieces strands directly in 3ds Max, because I will just recycle the parts that I already have. I kept the bow quite simple and only added some fabrics where the grip would be and some carvings. 
Also, added some patterns on the shoes but kept them quite subtle so they wouldn't draw the attention over there. 


At this point I was overall pleased with how the textures were looking and the only changes that I made were after I set up the lighting in Marmoset, which were small color and roughness changes. 
In total, it took me roughly 3 days to get to this look.
My next focus is rigging and skinning, which is more time consuming rather than complicated. I also want to add some hair cards to give more variation to the hair if I have time before the deadline. 

Hidatsa Character - Textures 1

At the start of the third week I began working on the textures. I approached them the same way I did with my previous character because it worked well for me that time, which was creating only the base materials at first and then add wear, damage and other details at the end. This way I am preventing myself for relying on the wear to make the materials interesting and force myself to create more accurate materials that would look good without any particular details ( basically some generic material which looks brand new, which would still have variation just from its base properties).
The most challenging part for this character was to make the materials look accurate so I spent some time reading about the way native american people made their clothing, what materials they used and what gave those their particular look. So, I decided to make the dress, pants and shoes out of buckskin, some rough cloth around her waist, another type of fabric for the belt, leather for the bracelets and wood accessories.
I gathered some real life references for the materials and started building them up with multiple layers, trying to imitate the look they have in reality. This wasn't a very complicated process, what I basically did was make layers with different colors and roughness values, add a black mask and grunges to apply them, then corrected them as I go, changed layers blending modes, or tiling, tone them down, break them up, it was just a lot of experimentation until I got the effect that I wanted. I did this for all the materials.


This is how the character was looking with only the bases, after roughly one day of work. I had some troubles deciding on the color palette so I tried out different colors until I got something that looked fin to me. I did this directly in Substance with color layers, as it was the quickest way for me to do it, and it would allow me to change them as much as I want to in a non destructive way. The colors that I have now are the results of layering multiple color fill layers on very low opacity. 
Apart from the clothing, I spent some time working on the skin as well. I did it in the same way as until now, and just hand painted mottling, freckles, redness, white/black pores, discolorations and such on multiple fill layers and adjusting them as I go. I tried to make the skin show the age of the character so I used a lot of references of old people to get the skin looking more accurate. 
Now the next step, is the go through each of the materials again and add more definition and wear to them. 

Tuesday, 3 December 2019

Hidatsa Character - Bake

As before, I baked the character in marmoset Toolbag. I set up 2 different bakers for my 2 textures sheets and multiple baking groups for all of the objects which I would influence each other. Before exporting my models I deleted the parts which would have overlapping textures, like the hands, quiver details, feathers, eyes, earrings.
I didn't get a lot of issues while baking and most of them I could fix directly in Marmoset. I am not completely happy with the AO map but I will fix it in Substance Painter so I can see exactly what I'm doing and how it's working with the textures, since there aren't any major errors anyway.


I've exported the bakes and imported everything in Substance Painter, I've split all the different materials in separate folders so now I am ready to start the textures, which I will be working on in the first half of the third week. 

Hidatsa Character - Low Poly & UV

I spent most of the second week working on the low poly. Before starting, I rescaled everything in Zbrush, decimated my subtools and exported them. As before, I made the low poly for some models directly in Zbrush with Zremesh and adjusted them with Zmodeler, this is how I made the belts and bracelets. For the quiver, I already had the low poly I imported from 3ds Max so I only had to adjust it a little. All the other parts of the model I retoped in Maya. Another one of my main goals for this project was to learn how to retopo in Maya, instead of 3D Coat which I've been using until now, and I found it quite easy and much more quicker than 3D Coat because of some additional tools it had.
The way that I built the the topology was by keeping it very low at the start to get the flow of the loops right and keep them clean, then slowly added more loops to smooth it out. When I made it I was mainly thinking about how it would deform and if it would maintain the silhouette and main shapes of my sculpt, but overall the topology is quite similar to the ones of my previous characters, as I was quite happy with how those were looking and bending (especially the hands). 
Retoping the character was quite straight-forward and I didn't have many troubles with it, the only thing which was a bit more challenging were the braids. In their case, I made a cylinder in 3ds max which I aligned on top of them with splines and tried having it follow the shape of the braid as much as possible; then I attached the cylinders to the hair cap which was retoped in Maya. I made them like this because I didn't want to go over budget (which would have been the case if I had 3 separate cylinders for one braid, like the way I built them), even though with one cylinder wouldn't perfectly keep the silhouette. This isn't that much of a problem because I am planning to add hair cards on top of them to add some variation and hide the cylinders. 
Also, I decided to give up on the beaded bracelet on her right hand because I wanted to keep each bead as a separate object, and in total I think that the bracelet was taking to much budget for being such a small object ( it had around 1.5k tris).  I remade the necklace as well to reduce the number of tris it had at the start because it was too much (around 3k tris) and managed to get it down to 1.3k tris which is still not great but acceptable. 


In total, together with the props, the character has around 19.4k tris, which would leave me with 5.5k tris to add hair cards and duplicate some feathers and arrows.
For the Unwrap, I split the character on two texture sheets, and I will add another separate one for the eyes, because I want to try and make a realistic material for them, and another sheet for the hair cards. I am still not sure how to split the budget between them but I will figure it out. 
I'm still not happy with the way I packed the UV islands because I couldn't find a way to have no empty spaces left, I tried out different layouts and in the end went with the best of those. I gave more space to the all the parts which would be skin, also made some small accessories a bit bigger so I could have some detail on them as well, like the beads, earrings and bird necklace.


Making the low poly and UVs took me most of the second week, the next thing that I want to get done as quickly as possible is the bake and then start the textures. 

Tuesday, 26 November 2019

Hidatsa Character - Sculpt 2

Spent the last half of the first week detailing the sculpt. I found doing an old person quite challenging and more time consuming. For my face sculpt, I used a lot of references of old native american women and tried replicating their features. I used references of old women from different tribes for the rest of the body as well and tried to make the details consistent and really give the impression that the character is aged. Still because of time constraints and wanting to finish the sculpt in one week, I had to be selective with the details that I would have on the body, so I spent the most time working on the face and hands.
When sculpting them, I started very broad to get the main shapes and proportions in place, and then worked my through secondary forms like the main wrinkles and skin folds. At first, I kept everything symmetrical so I could get the details done more quickly, but afterwards went back and changed the shapes on half of the face. Also, I added a scar on one side of her face to help with the asymmetry and because I figured that as a warrior, it wouldn't be uncommon for her to have scars. I am thinking of adding some more scars on the rest of her body if I finish in time. For the small skin details, I added noise to quickly have some pores covering the skin and then added more particular pores with alpha maps, on multiple layers so I could quickly tweak them if necessary.


For her overall build, I wanted to make it slim but still fairly toned and used references of old people who are very sporty and active, and noticed that their muscles were still quite toned and only the skin lost its elasticity and was hanging in certain areas. I wanted to keep the hands at the same level as the face so I spent some more time working on them to add wrinkles and skin folds. Looking at old women's hand pictures I noticed that the skin looks thinner, almost translucent in a way, and the veins are showing a lot, so I tried doing that on my sculpt as well. Also, changed the position of the fingers a bit because I felt like they were too bend before.


For the rest of the model, I had the same approach as until now, so I went back to each of parts, subdivided them and added more details on layers. Still, I didn't want to bother with adding stitches, cuts and things like that at this point, because I would that in the textures. Also, changed the pendant of the necklace completely because I was not happy with how it was turning out, instead I found a reference of a bird shaped necklace with a stone on it and changed it to that. I added some antlers at the end of the braids to give them more weight and thought it would be a nice detail, still keeping in the theme of the character. For the hair, I wanted to make a base sculpt in Zbrush and then add more details to it with hair cards, because I thought that having braids completely made out of hair cards would be very budget expensive and time consuming. 
The only things that I would still want to add to the model would be more feathers to decorate the quiver and maybe some tassels at the edge of the cloth wrapped around her waist but I am not completely sure about it. I would also want to make some arrows and a long bow, but I am planning to make all of them directly in 3ds Max.


At this point, I would call the sculpt done and it is time to start the low poly, on which I will work through the second week of the project.


Monday, 25 November 2019

Hidatsa Character - Sculpt 1

For this project I've decided to make my own concept because I couldn't find one that was fitting. I started by gathering a lot of reference about hidatsa people, their clothing, accessories and also took some inspiration from the Wild West challenge on Artstation. In the end I decided to make an old warrior lady who uses a long bow as her weapon of choice and in her design I incorporated features which I've seen on many native american people, like the dress with a piece of cloth tied on the waist for women, tasellated paints, soft leather boots, twin braids hairstyle, multiplte necklaces and bracelets with traditional motifs, but I still took my creative freedom with it and didn't make it completely historically accurate. Trying to balance the details and keep simple but still interesting in terms of accessories, which are quite complex in real life, I decided to just have a beaded necklace and bracelet, circular earrings, a long necklace with a big pendant, a leather bracelet with metal decorations, a metal upper arm bracelet and an leather armguard (for using the bow). In the case of the pants, rather than having them tassellated on the whole length, I preferred to just have a few tassel to get the idea across, the other pieces of clothing I would like to keep simple and detail them with the textures by adding patterns.
I didn't actually spent a lot of time creating a polished concept as it wasn't necessary, I just made a quick sketch for myself to see the main features that I want and then quickly blocked it in in Zbrush, and then made an overpaint of the model to decide on the final elements.


I started with a quick block in of the body, I didn't want to have it too detailed at first, just something to get the proportions right and make the clothes on top. One of my main goals with this project was to learn Marvelous Designer, which I used to create the top, waist cloth, skirt and pants. I watched a few introduction tutorials on it to get a sense for the interface and basic tools, and I didn't find that difficult to work with and create the pieces of clothing the way that I wanted. After importing the clothes to Zbrush I spent a bit more time on them to clean up the topology and fix some of the folds.
Next thing that I blocked in were the belt, bracelets and shoes. For the hair, I made the main hair cap from a sphere and the braids using Zspheres by creating the zig zag shape for one of the three hair strands of a braid and then duplicated it 2 times for the other strands, putting them in the right position and at the end, inflated them to close up the holes.

Marvelous Imports^


The next things that I wanted to get in were the accessories. Most of them I sculpted directly in Zbrush starting from primitive shapes. Made a feather hair ornament, circular earrings and a buffalo head pendant. For the beaded necklace and bracelet, I created 4 types of beads and made an insert mesh brush from them and used it in curve mode to create a string of beads where I wanted to place them. Also, I blocked in in 3dsMax a quiver to quickly place on the model and figure out the right position. For the pants, I decided to have a few tassels on the side and have stitches going from top to bottom.


At this point, I had all the main parts of the character in place, so the next step is to go back and detail everything over the next couple of days. 
This is the work that I managed to get done in the first 3 days of the project.