I barely finished the final renders in time for the hand-in but they are done!
I decided to make a PowePoint presentation to showcase the characters and the process. I included the main pictures for each stage of the process from this blog and the final renders. I didn't see the need to go over everything and explain them again since this blog contains all the information, so I thought I'd just focus on the images and use as few words as possible.
I had a lot of problems doing the voice recording, from making the programs work to the computer not recognizing my microphone. In the end, using multiple programs, I managed to get something recorded but the quality is not that great ( I apologise for all the noise in it). I tried making a short summary of the project to fit the 5 minutes frames, since going over everything individually took me over 7 minutes without even reaching half of the project.
I cleaned up the UE4 file before handing it in, just deleted the starter content and all the "test" files which I had in there. The 3ds Max contains all the characters in their final pose, together with the rigs and materials. Also, I added the pictures from the PowePoint separately too, just in case something happened with the ppt.
Reflecting back on these past 5 months, this project was definitely challenging and it made me push myself to the limit. I am glad that I managed to stick roughly to the schedule which I made before starting but I had to make some changes to adapt to unexpected events. At some points, I fell behind but I always managed to catch back up later and finish everything in time. I wish I had some more time for stretch goals and polishing things up, but I will work on that before adding this project to my online portfolio.
Looking back, I can see how I could have done some things better and there are areas which I am not completely happy with but I think the good outweighs the bad and I definitely learned a lot with this project. Going at full speed from start to finish to make everything consistently was difficult at times but I think my skills improved since the first character that I've done this year, which is what I wanted.
I am very happy to see this project done, I didn't imagine at the start that this is how it would turn out but I am not disappointed because I know that I did my best with the resources that I had at that time.
Finishing university now makes me a bit nostalgic and I feel like these 3 years passed in a blink. Of course, this is not an end, just a new beginning for my game art journey which I am excited to start. Learning never stops, so I won't either!
Thank you for taking the time to go over this lengthy blog and I apologise for all inconsistencies and spelling mistakes!
Showing posts with label FMP Batcat. Show all posts
Showing posts with label FMP Batcat. Show all posts
Friday, 29 May 2020

Thursday, 28 May 2020
FMP - Marmoset renders
I wanted to make individual presentation shots for each character and I decided to use Marmoset Toolbag for that because it is much quicker to set up materials and lighting (and also make wireframe renders). I am really pressed by time because it took a lot to figure out the UE4 stuff so I thought it would be best to do it like this and actually have a chance to finish the project before the deadline (also Marmoset renders were part of my stretch goals).
I made some more neutral poses for each character and set them up the usual way. I tried doing some more dramatic lighting this time and I added some smoke and dust backdrops to make the characters pop from the background. As always, it took some playing around with the lighting types, position, colours and intensities before finding something which looks nice.


I made some more neutral poses for each character and set them up the usual way. I tried doing some more dramatic lighting this time and I added some smoke and dust backdrops to make the characters pop from the background. As always, it took some playing around with the lighting types, position, colours and intensities before finding something which looks nice.


Overall, I am pleased with how the renders turned out. If I had the time I would have played a bit more with the lighting but I had to settle for something quite fast.
I regret that I had some other poses set up for all of them (without the glasses and scarf for the biker and without the cloak for the demoness) which I planned to present in a different lighting situation so I could show other angles of the characters, but I had to give up on that to make the deadline. I will probably keep working on those for my online portfolio and also polish what I have now.


Tuesday, 26 May 2020
FMP -UE4
For the UE4 presentation I decided to do a single scene with all three characters since they are supposed to belong in the same universe I thought that it would be fitting to present them all together.
After I rigged them all, I tried to pose them in a way which would look nice from all angles, this is why I didn't want to have them all facing the front. I tried doing some semi-dynamic poses, also I thought that having the two main characters being back to back kind of suggests their relationship and would look quite interesting.


Probably the most difficult part was setting up the shaders. I used my previous scenes in Marmoset as a reference for how the materials are supposed to look like and I used the Marmoset import plugin in UE4 to help me set up the shaders. Most of them were quite straight forward without additional settings, the only changes were converting some nodes to parameters, so I could make material instances which allowed me to tweak the materials easier and change the texture sheets. I had two types of textures sheet, high res ones which were 2k and lower res ones, 1k and 512, which fitted my budget of a 4k sheet per character. The differences between the resolutions aren't very obvious from a distance, but the high res ones look better for close up shots.
The most difficult parts were the skin, hair and eyes materials. I used the character benchmark project from Epic to study how they did those shaders for realistic characters, but while they looked amazing, the set up was far too complex for what I was trying to accomplish. So I watched some online tutorials, used the Marmoset materials as help and tried to come up with something looking decently. In the end, I couldn't really fix the hair and it's still looking a bit weird in some angles.
Also, I made some simple materials which I used for all characters for the eye occlusion, cornea and waterline.


After I rigged them all, I tried to pose them in a way which would look nice from all angles, this is why I didn't want to have them all facing the front. I tried doing some semi-dynamic poses, also I thought that having the two main characters being back to back kind of suggests their relationship and would look quite interesting.


Probably the most difficult part was setting up the shaders. I used my previous scenes in Marmoset as a reference for how the materials are supposed to look like and I used the Marmoset import plugin in UE4 to help me set up the shaders. Most of them were quite straight forward without additional settings, the only changes were converting some nodes to parameters, so I could make material instances which allowed me to tweak the materials easier and change the texture sheets. I had two types of textures sheet, high res ones which were 2k and lower res ones, 1k and 512, which fitted my budget of a 4k sheet per character. The differences between the resolutions aren't very obvious from a distance, but the high res ones look better for close up shots.
The most difficult parts were the skin, hair and eyes materials. I used the character benchmark project from Epic to study how they did those shaders for realistic characters, but while they looked amazing, the set up was far too complex for what I was trying to accomplish. So I watched some online tutorials, used the Marmoset materials as help and tried to come up with something looking decently. In the end, I couldn't really fix the hair and it's still looking a bit weird in some angles.
Also, I made some simple materials which I used for all characters for the eye occlusion, cornea and waterline.


I made some simple particles to make the scene more interesting. I wanted to make some flames for the demoness to suggest her powers and I also added some flying embers for presentation purposes. The last time I tried making particles was in the first year and I've almost forgotten how fun that was.
Setting up the lighting was quite tricky because I had to make things look nice from all angles and this stopped me from going for more dramatic lighting. I would have liked to have some more rim lights and maybe some more contrasting shadows but it didn't work out like that.


In the end, I added a post-process volume to enhance the image a little and reflection capture. The sky is just a simple sphere with a flat colour. Also, I made a simple matinee to make a turntable. It's just a camera attached to a sphere in the centre of the plinth (which is hidden) which is spinning around the models.
Overall, I think the scene is looking decent enough but I feel like I need much more practice in UE4 before creating awesome character renders. Also, this being the first time I am trying to render characters in Unreal, it was quite intimidating and it took a lot of trial and error to just get to what I have now.
It took me around 4-5 days to set up everything in the scene.
Friday, 22 May 2020
FMP - Rig&Skin
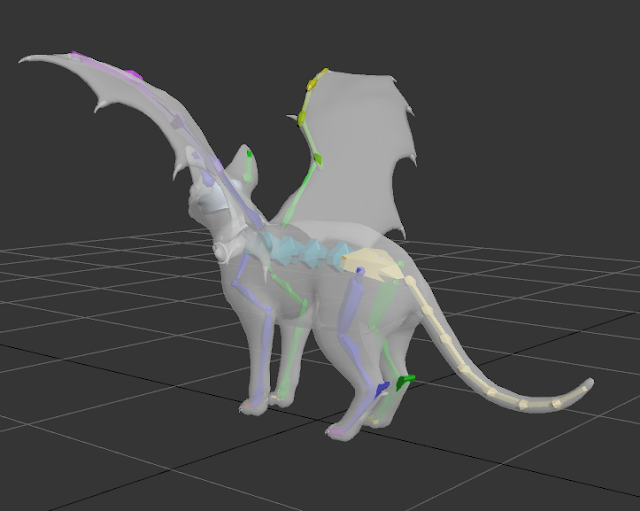
I rigged and skinned all characters in 3ds Max using the biped. I added additional bones for some areas to control them better (like the cloak and dress for the demoness, the chain for the biker).

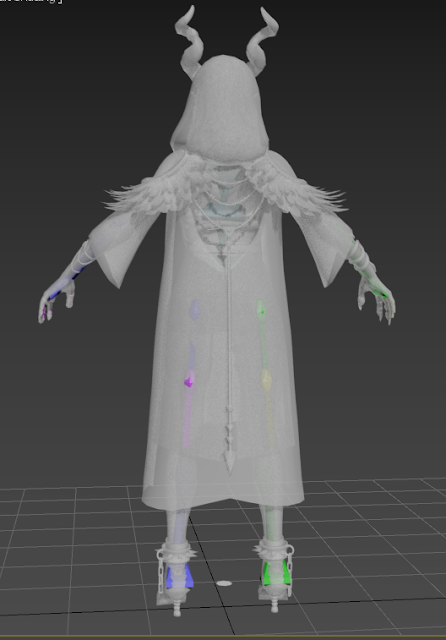



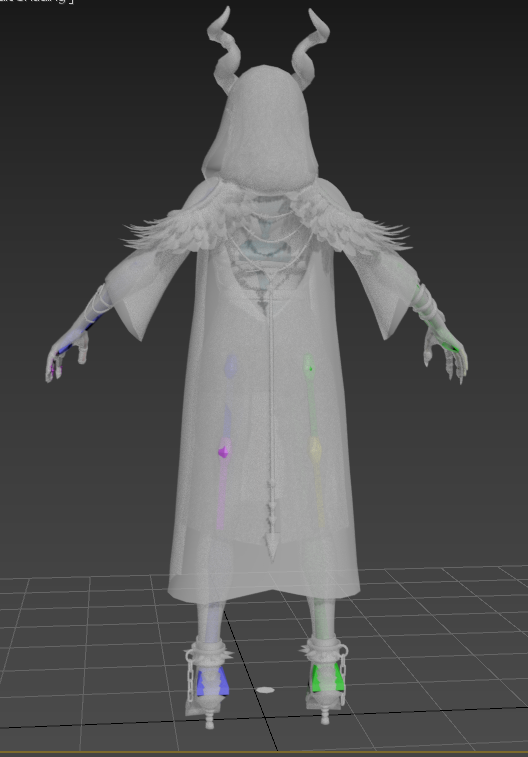


Because both characters have a lot of small objects and pieces attached to them and it was really difficult to skin it I decided to split the meshes. So I split the hair, eyes, the cloak (for the demoness) and the chain and cloth belt (for the biker). It was much easier to skin them afterwards to the same skeleton than trying to fix everything all at once.
Rigging and skinning took some days for each character. The meshes are deforming alright in most poses, but for some more exaggerated ones, there is some clipping which I couldn't fix. The part which is bothering me the most, are the sleeves of the cloak for the demoness because they should be affected by gravity and change shape depending on how she's moving her hands and I couldn't rig them to work well in all poses. Because I really have to move on and finish this project, I decided to adjust the areas which are not working properly when doing the final poses directly on the meshes, so they would look right in the renders (since the characters won't be animated anyway).

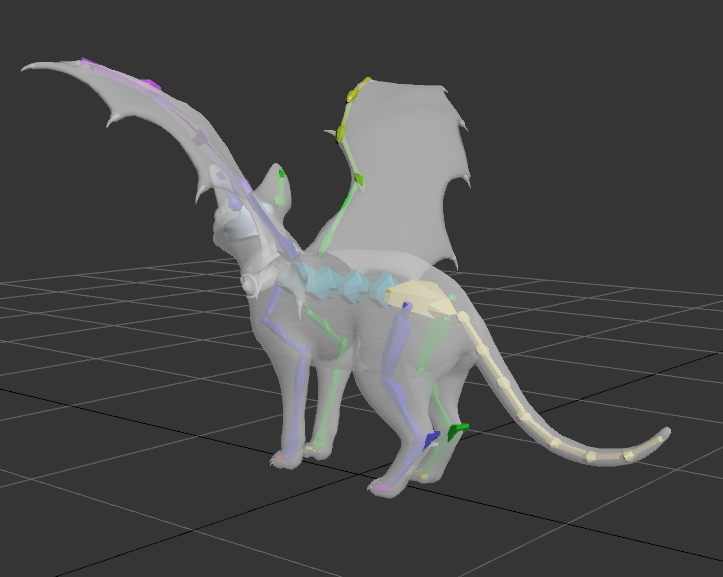
Rigging the cat was a bit trickier since I was starting from a biped, but I could find an example of a horse being rigged this way, so I tried to do something similar. I tried to adjust the bones so they would roughly fit the actual anatomy of a cat and added some more bones to control the wings and the ears.
Overall, it took an entire week to rig and skin everything and a few more days to work on the poses for the presentation. That leaves me with roughly a week to finish the presentations in UE4 and Marmoset before the deadline.
Saturday, 2 May 2020
FMP Batcat - Textures
After baking, I imported all the maps I got to Substance Painter and started working on the textures.
For the body, I looked mostly at white sphynx cats since I didn't want to add any darker spots on my cat and have it evenly coloured. Those white cats don't really have that much colour variation and what they have is very subtle (just different types of pinks, yellows, greys and the sort) so I tried to keep that look for my cat too, but in the end, changed the colours quite a bit to make it more fantasy looking, since it's a cat with bat wings anyway.
Also, I added a lot of dark/white spots, small veins and bigger ones on the wings and ears to have some variation. Despite this, all the details are quite subtle so I might go back and add some bigger ones but for the moment I'm still thinking about what those could be.
For the collar, I wanted to make it the same type of gold metal as the accessories on my demon character since the cat is going to ber pet. I made the eyes yellow too since I thought it matches the collar nicely.


That's how it turned out, I might play with the colours and values a bit more though (since now it's a bit pinkish in places, but the SSS contributes to this effect too) but I think it's at a good stage now and I can leave it like this for now.
I'm quite happy that I managed to get the parallax effect working on the eyes since it's quite an important elements for cat eyes and it makes them look more realistic.
I also worked a bit on the SSS map and I managed to get some nice effects for the veins on the wings and ears which I can use to get some interesting final renders at the end.


For now, I am fine with how the character turned out and I will put it aside for a bit until I come back to make changes ( as I did with all my other characters). It took me 2 weeks from the start to get to this stage which I'm really happy about because now I have enough time to finish everything nicely and make props too, which will be my focus for the next weeks.
Now, I am planning to go back to my previous characters and polish some areas and fix everything that needs fixing, then I'll rig all the characters and get them into the engine. Hopefully, this will not take more than 2 weeks, which leaves me with another 2 weeks to work only on the presentation (lighting, props, final renders).
I want to try doing some stretch goals which I had planned at the start too, the one which I would really like to attempt is doing different wear stages for the character but only with the textures (something like before and after battle) but I will see how that goes.
For the body, I looked mostly at white sphynx cats since I didn't want to add any darker spots on my cat and have it evenly coloured. Those white cats don't really have that much colour variation and what they have is very subtle (just different types of pinks, yellows, greys and the sort) so I tried to keep that look for my cat too, but in the end, changed the colours quite a bit to make it more fantasy looking, since it's a cat with bat wings anyway.
Also, I added a lot of dark/white spots, small veins and bigger ones on the wings and ears to have some variation. Despite this, all the details are quite subtle so I might go back and add some bigger ones but for the moment I'm still thinking about what those could be.
For the collar, I wanted to make it the same type of gold metal as the accessories on my demon character since the cat is going to ber pet. I made the eyes yellow too since I thought it matches the collar nicely.


That's how it turned out, I might play with the colours and values a bit more though (since now it's a bit pinkish in places, but the SSS contributes to this effect too) but I think it's at a good stage now and I can leave it like this for now.
I'm quite happy that I managed to get the parallax effect working on the eyes since it's quite an important elements for cat eyes and it makes them look more realistic.
I also worked a bit on the SSS map and I managed to get some nice effects for the veins on the wings and ears which I can use to get some interesting final renders at the end.


For now, I am fine with how the character turned out and I will put it aside for a bit until I come back to make changes ( as I did with all my other characters). It took me 2 weeks from the start to get to this stage which I'm really happy about because now I have enough time to finish everything nicely and make props too, which will be my focus for the next weeks.
Now, I am planning to go back to my previous characters and polish some areas and fix everything that needs fixing, then I'll rig all the characters and get them into the engine. Hopefully, this will not take more than 2 weeks, which leaves me with another 2 weeks to work only on the presentation (lighting, props, final renders).
I want to try doing some stretch goals which I had planned at the start too, the one which I would really like to attempt is doing different wear stages for the character but only with the textures (something like before and after battle) but I will see how that goes.
FMP Batcat - Low Poly, UVs & Bakes
After I finished the sculpt, I retoped everything in Maya. I tried to keep the geometry as clean and even as possible but it was quite challenging in some places as it was the first time I was trying to do an animal. Again the most challenging areas were the head and the feet. I preferred to add more loops in some areas to keep the silhouette nice even though they got denser than other parts.
In the end, the model has around 17k tris which I think it's acceptable for a creature at this size (since it's going to be normal cat size and you probably wouldn't see it up close most of the time).


All these took 3-4 days to do which is great and now I can start the textures.
In the end, the model has around 17k tris which I think it's acceptable for a creature at this size (since it's going to be normal cat size and you probably wouldn't see it up close most of the time).


I unwrapped everything in Maya and split it in two texture sheets, one for the body and one for the collar and claws (and later one more for the eyes). Again, I was thinking mostly about materials when I split the textures.


As before, I baked everything in Marmoset Toolbag and fixed any errors I had directly in Marmoset or in Photoshop.


All these took 3-4 days to do which is great and now I can start the textures.
Friday, 24 April 2020
FMP Batcat -Sculpt
After the previous 2 and a half weeks I've spent working on the hair for the other characters, I started working on my last character, which is a creature. I wanted to keep it quite simple as I don't have that much time left to do something very complex and I've never done any kind of creature (or animal) before. I wanted the creature to be some sort of familiar for my demon character and I was trying to choose between doing some kind of very spiky lizard or a sphynx cat with bat wings, in the end, I chose to do the cat because I found some artworks which illustrated quite well what I had in mind for it and I wasn't that sure what to do for the lizard, and both opinions didn't have any fur or feathers which is just what I wanted.




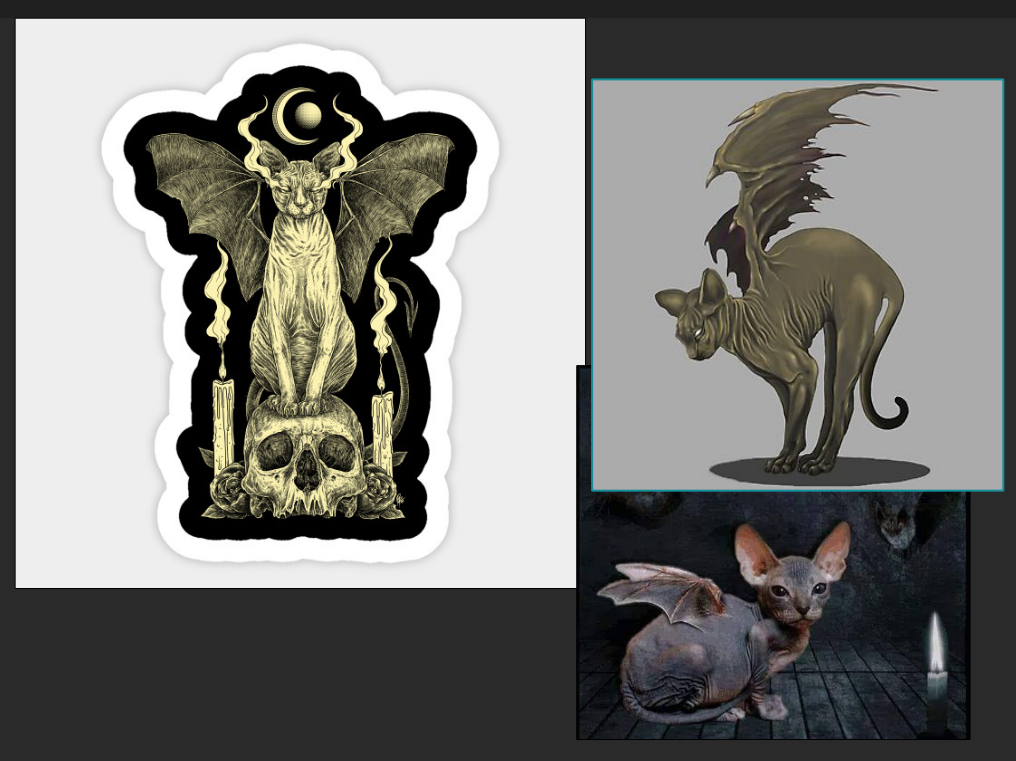
Those were the main ideas for the cat, I think the one on the left would also look quite interesting for a final render idea.
I started directly in Zbrush with a sphere and dynameshed it to get the general cat shape. At first, I wasn't focused on the wings at all and connecting them and I just tried to get the cat anatomy right, which took a lot of trial and error. Looking at real sphynx cats, they are very different from each other, some are really tall and slim and others small and wrinkly, so I tried to find a balance between those. Also, I chose to simplify the shapes in some areas, like the feet and ears, and just tried to get the main shapes across without all the very small details which are present in real life (since the feet won't be main focus anyway). My main focus was getting the head right since that's the main focus and it's very distinct for sphynx cats.


After I got something resembling a cat shape I added the wings. I was looking at bat wings as my main references (since I thought that would fit well for these types of cats). I made the main shape of the wings as planes in 3ds Max because it was easier and quicker for me and then brought that to Zbrush, added thickness and connected that to the main body with dynamesh and then Zremeshed the body. I detached the head from the body to be able to sculpt on it more easily and because the neck will be covered by a collar anyway.


After I had these in place, I started defying the shapes a bit better and getting in some details. Probably the most challenging part of the anatomy were the feet and it took some time to get something acceptable for them.
Also, I wanted to keep the brush strokes quite visible, since they would blend well with the wrinkles and would give the body a more fleshy look.

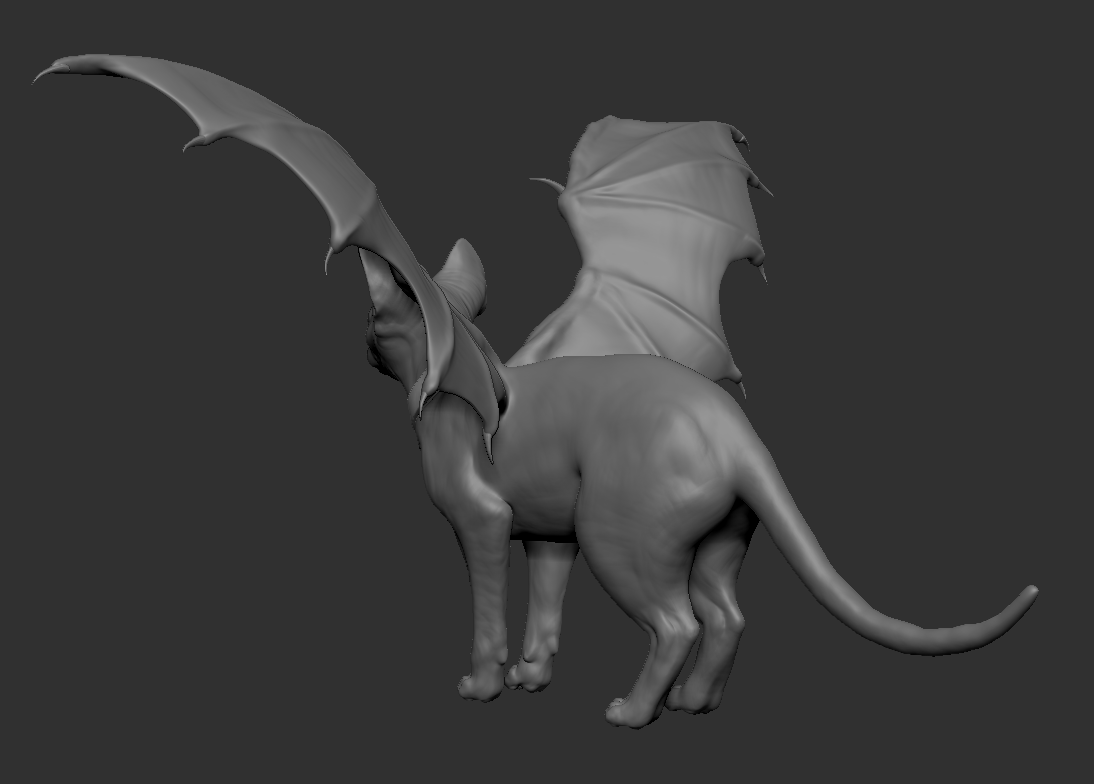
I started adding the wrinkles only after I was happy with the main shapes and made separate layers for all of them so I could change them easily if I needed to. Sphynx Cats can be both extremely wrinkly and not have that many wrinkles at all, so I tried to find a balance with those and only have them in some places where it would make sense.


Later, I added the claws too and remade the spikes on the wings. I wanted to add whiskers too but I read that not all Sphynx cats have them and in most pictures that I found they didn't have whiskers. For the collar, I made an ornament inspired by the illustration I had found as a concept since it was matching the theme of my characters too and it would look nice.
I also added some surface noise to make the skin a little bumpy.

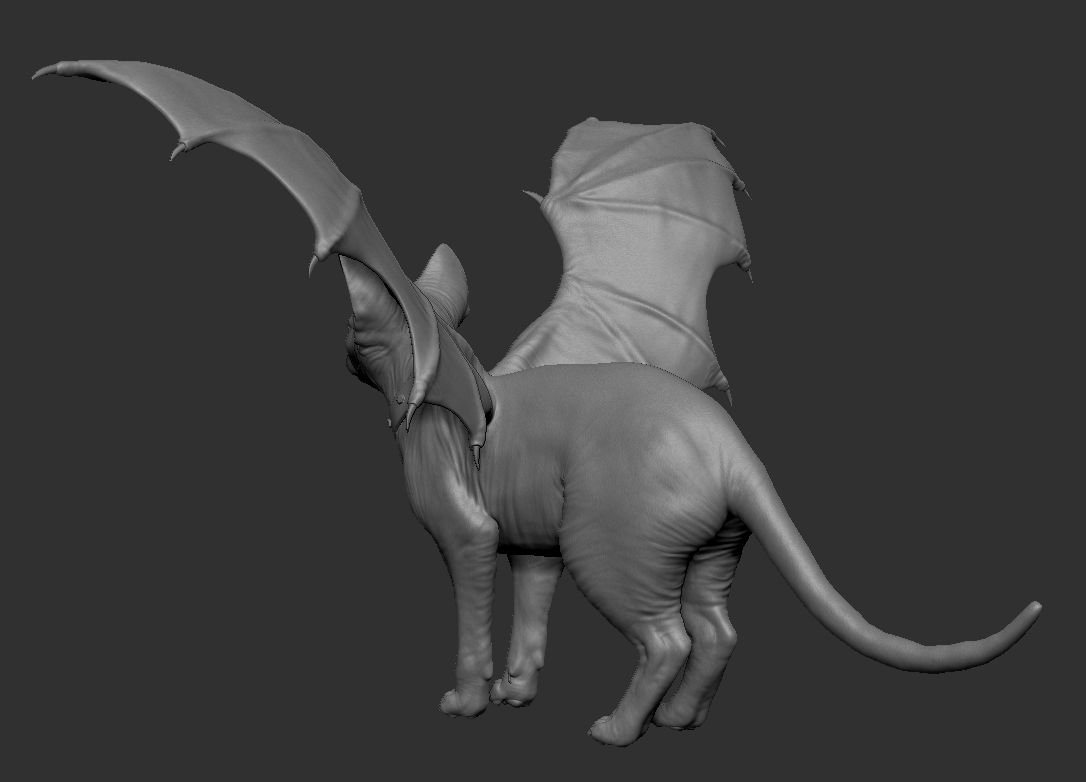
This is how the sculpt turned out in the end, I could have added some smaller details like pores and veins too but I will leave that for the texturing part. It took me an entire week to get to this stage but I prefer to move on now and make changes at a later time if I need to, since I want to finish this character as soon as possible and then spend the remaining time before the deadline polishing everything and working on the final presentation.


Subscribe to:
Posts (Atom)