Friday 24 April 2020

FMP Batcat -Sculpt

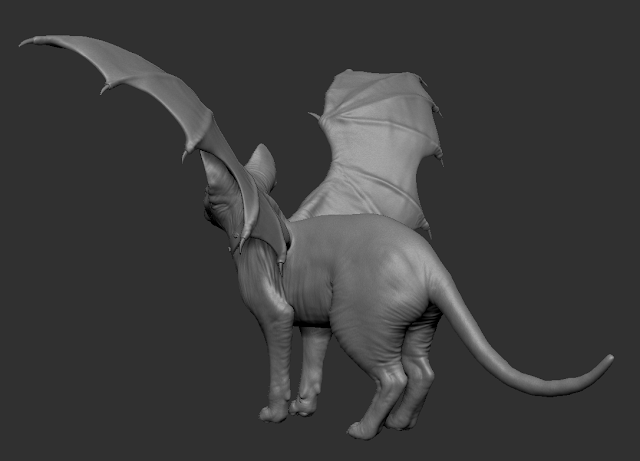
After the previous 2 and a half weeks I've spent working on the hair for the other characters, I started working on my last character, which is a creature.  I wanted to keep it quite simple as I don't have that much time left to do something very complex and I've never done any kind of creature (or animal) before. I wanted the creature to be some sort of familiar for my demon character and I was trying to choose between doing some kind of very spiky lizard or a sphynx cat with bat wings, in the end, I chose to do the cat because I found some artworks which illustrated quite well what I had in mind for it and I wasn't that sure what to do for the lizard, and both opinions didn't have any fur or feathers which is just what I wanted. 


Those were the main ideas for the cat, I think the one on the left would also look quite interesting for a final render idea.
I started directly in Zbrush with a sphere and dynameshed it to get the general cat shape. At first, I wasn't focused on the wings at all and connecting them and I just tried to get the cat anatomy right, which took a lot of trial and error. Looking at real sphynx cats, they are very different from each other, some are really tall and slim and others small and wrinkly, so I tried to find a balance between those. Also, I chose to simplify the shapes in some areas, like the feet and ears, and just tried to get the main shapes across without all the very small details which are present in real life (since the feet won't be main focus anyway). My main focus was getting the head right since that's the main focus and it's very distinct for sphynx cats. 


After I got something resembling a cat shape I added the wings. I was looking at bat wings as my main references (since I thought that would fit well for these types of cats). I made the main shape of the wings as planes in 3ds Max because it was easier and quicker for me and then brought that to Zbrush, added thickness and connected that to the main body with dynamesh and then Zremeshed the body. I detached the head from the body to be able to sculpt on it more easily and because the neck will be covered by a collar anyway. 


After I had these in place, I started defying the shapes a bit better and getting in some details. Probably the most challenging part of the anatomy were the feet and it took some time to get something acceptable for them. 
Also, I wanted to keep the brush strokes quite visible, since they would blend well with the wrinkles and would give the body a more fleshy look. 


I started adding the wrinkles only after I was happy with the main shapes and made separate layers for all of them so I could change them easily if I needed to. Sphynx Cats can be both extremely wrinkly and not have that many wrinkles at all, so I tried to find a balance with those and only have them in some places where it would make sense.


Later, I added the claws too and remade the spikes on the wings. I wanted to add whiskers too but I read that not all Sphynx cats have them and in most pictures that I found they didn't have whiskers. For the collar, I made an ornament inspired by the illustration I had found as a concept since it was matching the theme of my characters too and it would look nice. 
I also added some surface noise to make the skin a little bumpy. 


This is how the sculpt turned out in the end, I could have added some smaller details like pores and veins too but I will leave that for the texturing part. It took me an entire week to get to this stage but I prefer to move on now and make changes at a later time if I need to, since I want to finish this character as soon as possible and then spend the remaining time before the deadline polishing everything and working on the final presentation. 


Thursday 16 April 2020

FMP Demoness -Hair

For the past days, I've been working on the hair for my second character. I didn't want to do something very complicated for it, so I tried going for a shoulder-length wavy hairstyle.
I made the textures in Maya with xGen just like I did for the previous character, and placed the hair cards in 3ds Max. I approached the process in a similar way as last time and built the hair in layers, starting from the base hair which would cover all the scalp, multiple breakup layers and some flyaway strands. Also, I added thin hair strands on her eyebrows and eyelashes.
The hair in total has around 4.7 k tris which makes this character almost 20k tris under the budget that I had. I can see now that there are some areas where I could have spent a few more tris but it is looking decent as it is and I don't have the time to remake things now. I am thinking of adding some more accessories which were in my initial concept of the character but I am leaving that for the end if I have time for them before the deadline.


There are some hair areas which need to be adjusted but I am leaving that for later, as well as doing the finishing touches to the textures because I need to start the last character now if I want to finish everything in time. I am planning to spend no more than 3 weeks on the last one but I am not sure how things will turn out, hopefully I'll manage everything.
Doing the hair took a lot of time, I had quite a lot of issues with it and the software and I spent at least 4 days just remaking things because they didn't turn out well. This is why I had to spend a few more days than I had initially allocated for the hair to finishing these things up. Still, I'm glad that I managed to learn xGen and get some decent hairstyles done for my characters so the whole experience was worth it, now I just need to catch up on the work.


Here's a small gif to show some stages the hair went through.

Monday 13 April 2020

FMP Biker -Hair

I took a break from working on the textures and started working on the hair for both my characters. I have planned to spend 2 weeks working on those but because I had some software troubles at the start I will have to spend 2-3 more days finishing things up.
For the first character, I was trying to go for a messy kind of bowl cut with a dark undercut. I thought that having his hair dyed a light colour with only the roots showing his natural hair colour would look interesting and would also match the whole look of the character. These were my main references for the hair, but  I ended up doing it straight rather than curly.


I created the hair cards in Maya, as I really wanted to learn how to use xGen. I watched a lot of online tutorials and it took a bit of time to get accustomed to it but I am happy with the results I was able to get out of it and all the types of maps which it can generate. To place the hair cards I used 3ds Max using splines. The way I approached it was building up layers, the base ones defining the overall shape of the hair, some breakup layers and then some flyway layers. At the end, I merged all the layers and adjusted the overall shape a bit.


I also made some eyelashes and thin hairs for the eyebrows to give them a bit of volume from the side view. The main shape of the eyebrows and the shaved hair I handpainted in Substance Painter and added a height layer to give them some definition. I had 10k tris left for the hair but I knew I wouldn't use all of those for the hairstyle that I chose, at the moment the hair has around 2.6k tris but I still have to adjust some sharp edges in a few places so it might go up a bit.


I made a quick gif to show some stages the hair went through. It changed quite a lot from the start and even though there are still some areas I am not completely happy with, this will have to do for now as I have to move on and finish everything.

Now, I am working on the hair for my other character which is still in early stages but hopefully, I will be able to finish it in a few more days.