Friday, 24 April 2020

FMP Batcat -Sculpt

After the previous 2 and a half weeks I've spent working on the hair for the other characters, I started working on my last character, which is a creature.  I wanted to keep it quite simple as I don't have that much time left to do something very complex and I've never done any kind of creature (or animal) before. I wanted the creature to be some sort of familiar for my demon character and I was trying to choose between doing some kind of very spiky lizard or a sphynx cat with bat wings, in the end, I chose to do the cat because I found some artworks which illustrated quite well what I had in mind for it and I wasn't that sure what to do for the lizard, and both opinions didn't have any fur or feathers which is just what I wanted. 


Those were the main ideas for the cat, I think the one on the left would also look quite interesting for a final render idea.
I started directly in Zbrush with a sphere and dynameshed it to get the general cat shape. At first, I wasn't focused on the wings at all and connecting them and I just tried to get the cat anatomy right, which took a lot of trial and error. Looking at real sphynx cats, they are very different from each other, some are really tall and slim and others small and wrinkly, so I tried to find a balance between those. Also, I chose to simplify the shapes in some areas, like the feet and ears, and just tried to get the main shapes across without all the very small details which are present in real life (since the feet won't be main focus anyway). My main focus was getting the head right since that's the main focus and it's very distinct for sphynx cats. 


After I got something resembling a cat shape I added the wings. I was looking at bat wings as my main references (since I thought that would fit well for these types of cats). I made the main shape of the wings as planes in 3ds Max because it was easier and quicker for me and then brought that to Zbrush, added thickness and connected that to the main body with dynamesh and then Zremeshed the body. I detached the head from the body to be able to sculpt on it more easily and because the neck will be covered by a collar anyway. 


After I had these in place, I started defying the shapes a bit better and getting in some details. Probably the most challenging part of the anatomy were the feet and it took some time to get something acceptable for them. 
Also, I wanted to keep the brush strokes quite visible, since they would blend well with the wrinkles and would give the body a more fleshy look. 


I started adding the wrinkles only after I was happy with the main shapes and made separate layers for all of them so I could change them easily if I needed to. Sphynx Cats can be both extremely wrinkly and not have that many wrinkles at all, so I tried to find a balance with those and only have them in some places where it would make sense.


Later, I added the claws too and remade the spikes on the wings. I wanted to add whiskers too but I read that not all Sphynx cats have them and in most pictures that I found they didn't have whiskers. For the collar, I made an ornament inspired by the illustration I had found as a concept since it was matching the theme of my characters too and it would look nice. 
I also added some surface noise to make the skin a little bumpy. 


This is how the sculpt turned out in the end, I could have added some smaller details like pores and veins too but I will leave that for the texturing part. It took me an entire week to get to this stage but I prefer to move on now and make changes at a later time if I need to, since I want to finish this character as soon as possible and then spend the remaining time before the deadline polishing everything and working on the final presentation. 


Thursday, 16 April 2020

FMP Demoness -Hair

For the past days, I've been working on the hair for my second character. I didn't want to do something very complicated for it, so I tried going for a shoulder-length wavy hairstyle.
I made the textures in Maya with xGen just like I did for the previous character, and placed the hair cards in 3ds Max. I approached the process in a similar way as last time and built the hair in layers, starting from the base hair which would cover all the scalp, multiple breakup layers and some flyaway strands. Also, I added thin hair strands on her eyebrows and eyelashes.
The hair in total has around 4.7 k tris which makes this character almost 20k tris under the budget that I had. I can see now that there are some areas where I could have spent a few more tris but it is looking decent as it is and I don't have the time to remake things now. I am thinking of adding some more accessories which were in my initial concept of the character but I am leaving that for the end if I have time for them before the deadline.


There are some hair areas which need to be adjusted but I am leaving that for later, as well as doing the finishing touches to the textures because I need to start the last character now if I want to finish everything in time. I am planning to spend no more than 3 weeks on the last one but I am not sure how things will turn out, hopefully I'll manage everything.
Doing the hair took a lot of time, I had quite a lot of issues with it and the software and I spent at least 4 days just remaking things because they didn't turn out well. This is why I had to spend a few more days than I had initially allocated for the hair to finishing these things up. Still, I'm glad that I managed to learn xGen and get some decent hairstyles done for my characters so the whole experience was worth it, now I just need to catch up on the work.


Here's a small gif to show some stages the hair went through.

Monday, 13 April 2020

FMP Biker -Hair

I took a break from working on the textures and started working on the hair for both my characters. I have planned to spend 2 weeks working on those but because I had some software troubles at the start I will have to spend 2-3 more days finishing things up.
For the first character, I was trying to go for a messy kind of bowl cut with a dark undercut. I thought that having his hair dyed a light colour with only the roots showing his natural hair colour would look interesting and would also match the whole look of the character. These were my main references for the hair, but  I ended up doing it straight rather than curly.


I created the hair cards in Maya, as I really wanted to learn how to use xGen. I watched a lot of online tutorials and it took a bit of time to get accustomed to it but I am happy with the results I was able to get out of it and all the types of maps which it can generate. To place the hair cards I used 3ds Max using splines. The way I approached it was building up layers, the base ones defining the overall shape of the hair, some breakup layers and then some flyway layers. At the end, I merged all the layers and adjusted the overall shape a bit.


I also made some eyelashes and thin hairs for the eyebrows to give them a bit of volume from the side view. The main shape of the eyebrows and the shaved hair I handpainted in Substance Painter and added a height layer to give them some definition. I had 10k tris left for the hair but I knew I wouldn't use all of those for the hairstyle that I chose, at the moment the hair has around 2.6k tris but I still have to adjust some sharp edges in a few places so it might go up a bit.


I made a quick gif to show some stages the hair went through. It changed quite a lot from the start and even though there are still some areas I am not completely happy with, this will have to do for now as I have to move on and finish everything.

Now, I am working on the hair for my other character which is still in early stages but hopefully, I will be able to finish it in a few more days.

Monday, 30 March 2020

FMP Demoness - Textures 1

The week I finished baking (on Monday), was the last week the university was open, so taking into consideration what was happening with the virus I decided that it would be best to return back home until the situation calms down. I didn't manage to get much work done that week since I had an interview and the rest of the time was spent packing, travelling and then setting up my workspace at home. My computer at home is not as fast as those in the labs but it can still handle most programs decently so hopefully I won't have many problems with that and I can finish everything on time. 

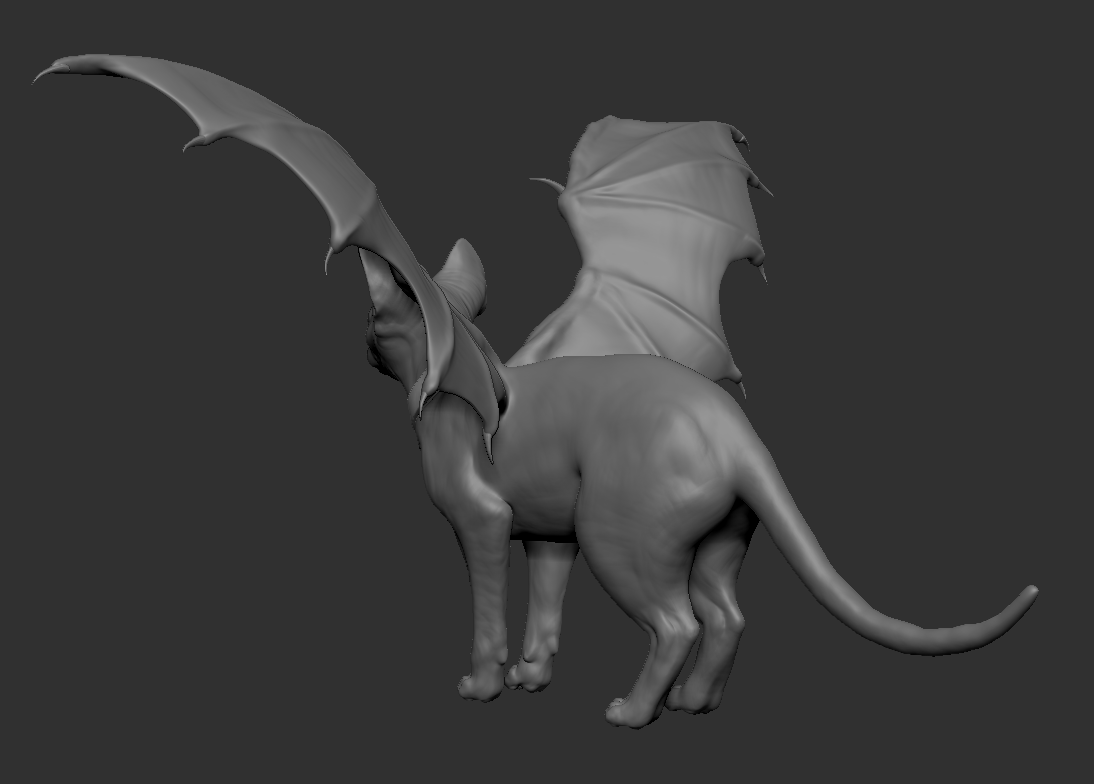
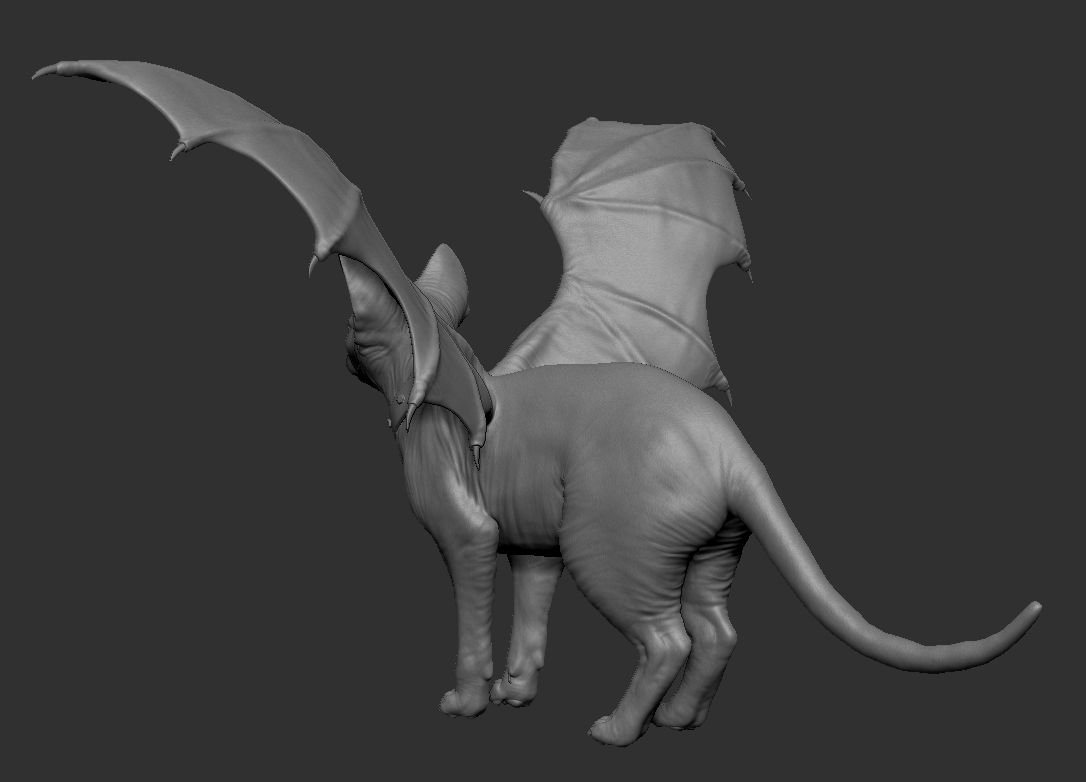
So after this busy week, I was finally able to start texturing the character. I had references for most of my materials so I had a fairly good idea on what the materials are supposed to look like. At first, I tried getting the base properties of the materials right without worrying about wear at all. This is how I built the materials for my previous character too, which is a method that works really well for me because it forces me to make interesting materials (as brand new)  without relying on the wear and tear. 


This was the first material pass. Probably, the most challenging materials for this character were the fabrics, the ones on her dress and the lace material. The lace was actually a bit easier than I expected, I made the base fabric material first and then masked with a lace tiling alpha (and added height to it). It was much more challenging to get the dress material to look how I wanted to since I wanted to make it look quite elegant and have some highlights on it. Adding metalness to some of the areas did this trick quite well without making the material look like plastic (I mainly used references of the sorceresses' dresses from Witcher 3).


After a second pass, I started adding more details and adjusting the materials. I started thinking about the wear of the materials too, I don't want to make these characters very worn given the world context but some battle damage would make sense (I am trying to find a balance for now, if I have time, one of my stretch goals is to make different battle-worn levels for the characters). 
I added a bit of opacity to the lace material, a mid-value to go over the entire mesh. I think that it works better now and it resembles more the material I was going for. I am still not sure about the thick edges of the material, I am thinking of adding some tears right near the edges to break the continuous lines. 
Also, I started adding some height patterns to the metals and other areas, most of those have only decorative purposes and I think they contribute to the elegance that I wanted my character to have. Only the patterns on her rings are some demonic sigils that I found, I thought that adding those might help suggest her powers. 
I wanted to make the shackles on her legs visibly older and more worn than all the other materials, since she was supposed to have been imprisoned for a long time and freed when she made a contract with my previous character ( I hope I cand find some names for them until I finish the project, but that's the hardest part). After being freed from imprisonment, I didn't want her to lose those chains completely as a way to suggest that she is still bound (with the contract) and not completely free to use her powers ( I added the glowing marking on the shackles to give them a more supernatural look, so it would be more visible that they are not regular chains which can be broken easily). This character's main motivation to collaborate with the biker dude (who is a demon hunter) is to find a way to be completely free and regain her powers (which the biker guy can channel through the contract and make him more op).
Something more challenging about both these characters is showing that some of the things they're wearing have different ages, so they would need to have different wear levels too (and on top of that comes the battle damage which is a different story). For this one, the shackles are visibly older, the dress is supposed to seem different from the other materials too (it should be something that she had before the imprisonment, that's why I was looking at references from the Witcher which is medieval) and all the other things should belong in the modern world. I think those aspects are quite difficult to illustrate and match together so things wouldn't seem completely out of place or unplanned (or just a mistake). I don't think I was that successful showing these aspects through my first character and this one still need a lot more work too, but hopefully, I can find a balance.


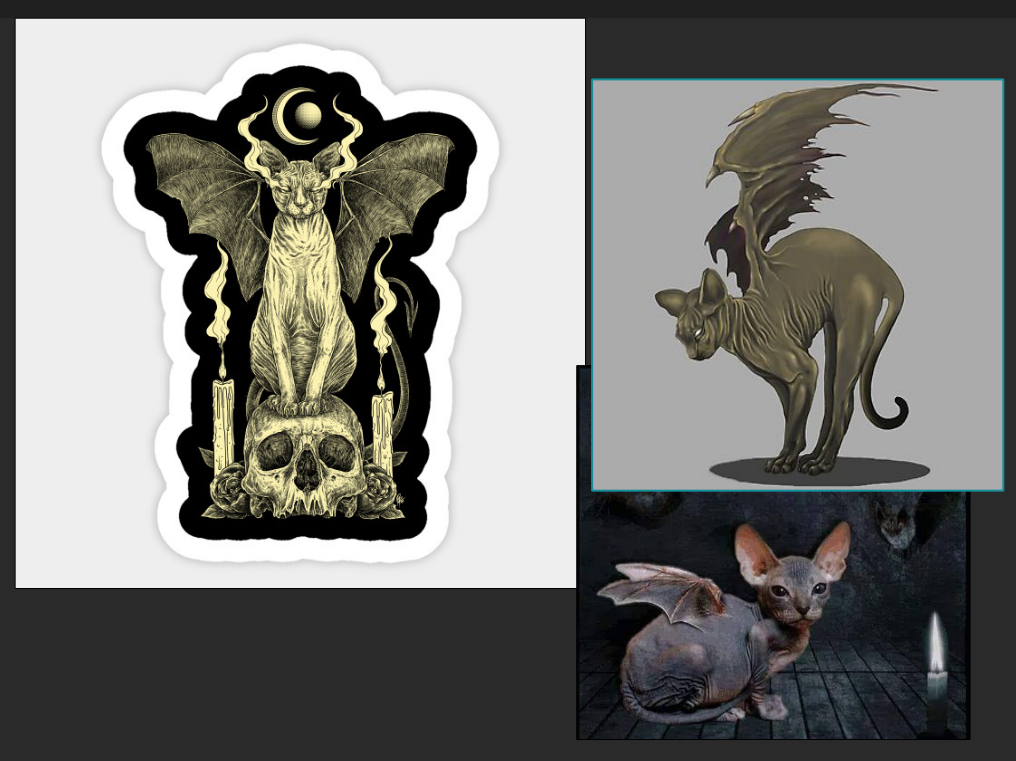
 I tried to suggest the demonic look through her skin material too, that's why I added a lot of veins on it to kind of make it look translucent (being imprisoned for a long time it would make sense to for her to be very pale too). Making her eyes glowing contributes to that look too, also I think it would help for some dramatic lighting renders at the end. The horns were quite challenging, I looked at a lot of real-life references but I found it quite difficult to get the material properties right. 

The main element which is missing is the tattoo on her back. That's a big part of her design so it's important for me to get it right. I tried out a few patterns but none were looking right so I am gathering more references. I am considering extending the tattoo over other parts of her body too ( which would make her look more demonic) but I would have to see how that works. Also, though about making the tattoo emissive, I think it would make some cool final renders but wouldn't make much sense otherwise. The third option would be to make a scar instead of a tattoo, something like hot iron branding, but I still have to look into how I could texture that convincingly (it's also important to make the scar look different from the one on my previous character since they would have different causes).

This is the progress that I managed to make in one week. I still have a lot to do before the textures will be finished but it's getting there. Until I decide on what to do with the tattoo/scar I will take a break from texturing and start working on the hair for both my characters, as this will be quite time consuming too. 

Monday, 16 March 2020

FMP Demoness -Low Poly, UVs, Bakes

I spent a week working on the low poly, UVs and bakes. I'm quite happy that I managed to finish all of these so now I'm not that behind on schedule anymore.
For the low poly, I already had some of the objects (like belts, buckles) made as low polys from the start so I only needed to adjust them. The other parts I retoped in Maya, I really tried to keep the silhouette of the objects, have clean loops for deformation and keep everything at the same poly density. The only part which is higher in density is the face, as I didn't want to have any sharp edges around there, I also added some more loops on the sleeves of the cloak just to be safe, so it wouldn't clip with the arm. 


 The low poly has around 43k tris in total, my budget is of 70k tris so this leaves me with a lot of budget for the hair ( I don't think that I'll actually get to 70k though, the hair wouldn't probably have more than 10k).


My texture budget is one 4k sheet for the entire character, so I decided to split it in more 1k sheets for all the different areas like I did with my previous character. I mainly took into consideration the material the objects are going to be made of when splitting those, this way it would be easier to set up the properties for each material in engine. The only issue that I have with this method is that there is quite a bit of empty space on some of the sheets, but overall I can get more details in than if I had grouped them all together. I ended up with 9 texture sheets and I will need to add 2 more, one for the hair and one for the eyes.


After I've finished those, I baked the normal, normal obj, thickness, curvature and ao maps in Marmoset Toolbag. This was quite straight forward and I didn't get any big errors which I couldn't fix directly in Marmoset. 
I'm happy that now I can finally begin working on the textures since this is going to be a big part of the character and that I managed to save some time and catch up on my schedule.

Sunday, 15 March 2020

FMP Demoness -Sculpt 2

I spent another week finishing up the sculpt. I went over everything and tried to get them all at the same stage of polish. I didn't want to add many surface details at this point as it would be quicker and easier to do that in Substance Painter. 


That's how the sculpt ended up looking at the end. The only thing that I added was a ring on one of her horns to break the symmetry and apart from that, I just tried to fix everything and get some nice details in. If there is something else that catches my eye, I will fix that on the go, as I really have to move on to the next stage now if I don't want to fall behind on my schedule. 


Fortunately, some of the objects are already low polys so I don't have a lot to retop, I am hoping I can speed things up a little now and finish the low poly and UV in another week. 


I took a pic almost every day so I thought I'd make a gif of the process. 

Sunday, 8 March 2020

FMP Demoness -Sculpt 1

Week 21, started working on my second character for the FMP. The first one is still not completely done, I have to finish the hair and the rig, but it is at a decent stage so I will keep working on it on the side since I need to start the second character so I won't fall behind on my schedule.
For this character, I have decided to do a demon lady to match the backstory that I wrote for my characters. The main ideas for her are to make her look mysterious, misleading and much more elegant than my first character, I am trying to design my characters as opposites of each other. For the clothing style, I tried to mix a few styles together rather than just go for a clear one (like the clear biker style for the other character) since she is supposed to come from another dimension and had to adapt to the modern world, I thought it would make sense that she would mix her clothes in an unusual way. To make her design I just combined the references from my mood board and made a few initial sketches, after I got a better idea of where the design it's going, I blocked in the main shapes in Zbrush and Marvelous Designer and drew over that to further define the design and added some material callouts. 


I started working on her the usual way, blocked in the body directly in Zbrush, made the base of the clothing in Marvelous Designer. Because I had a lot of leather straps going around her body, I decided to make those in 3ds Max and the bring them to Zbrush. This way I had more control over them and could also make the low poly as I go so I wouldn't have to retop them. I found that starting in 3ds Max actually helped me make a cleaner base which would be easier to handle in Zbrush, so I decided to make the metal accessories and boots like this too. 


This was the block-in of the main elements of her design, it is still missing the cloak and the accessories on her hands. It took me a week to get to this stage, I sculpted very little details, most of the work was on her body so the clothing still needs a lot of work. Still, I am happy that some of the objects that I have are already low polys so I won't need to retop them, it was definitely good to do them like this even though it took a bit more time, but hopefully, I will be able to save some time on the go. 


This was the result after two weeks of work. Most of the elements in her design are there, now everything just needs detailing. Hopefully, I will be able to finish the sculpt in another week. I couldn't work as fast as I wanted to on this character, life kept getting in the way and I had to take some time off.
Even though I am a few days behind schedule, I am happy with the result until now and hope I can speed up the work later down the line. 


Thursday, 20 February 2020

FMP Biker -Textures 3

I made a quick test scene in Marmoset to get an idea of what the materials would look like and play a bit with the material settings. I know that this is likely to change when I put it in UE4 but I find it a little easier to try and copy the look from Marmoset at first and work my way from there for the final presentation. 


I am going to change the lighting set up as well because now it is really flat, as I just wanted to see the details on all my materials, but for the final renders, I would like to have some more dramatic lights going on. Also, the alpha map is not really displaying properly for my top piece but when I tested it in UE4, it looked much better, so I decided not to change it at the moment just for Marmoset. 


I wanted to try some new things which I didn't do for my other characters, which were doing a fuzz map for the fabrics, an SSS map for the skin, setting up the parallax effect in the eyes and adding a transitional mesh between the eyeballs and the eyelids. I think that even though those details are quite subtle, they do make a difference and give a nicer look to the materials overall.


With(left) and without(right) the SSS map, eye parallax and eye transition^

After getting some very good feedback from the people from Dambusters Studios and Ubisoft, I changed some errors I failed to see until then, and also got some nice ideas for what I could do to further enhance this character. 
One of the very important things that I neglected was the size of his eyes, which was quite a bit bigger than it should have and fixing that was a nice improvement. Also, some areas needed more roughness variation so the highlights would look better and more varied,  like the skin, front of the vest and boots. Also, fixed the alphas on the fabrics to make them look a bit cleaner and more varied at the edges. I worked a bit more on the tertiary details too and that made the materials look much nicer from a closer view. The stitches needed a bit more work too, before they were only sitting on top of the clothing rather than actually going in, so I added that pressure in the fabric with a height layer. 
I still have a few more things to add to the textures, like some more edge wear and dirt in the lower part of the body, fix the colours in the tattoo and make better AO transition between the objects, but for now, I will leave it like this and come back at a later time to change those, as I am running a few days late. 
The last week that I had allocated for this character I mainly spent doing some research into UE4 shader settings and presentation and made a few tests, still got a bit more work to do before making things look presentable. Also, looked more into hair cards, how to create them with Maya xGen and place them. The hairstyle of this character is quite simple so I am not that worried about it, but my next character will have a much complex hairstyle so I feel like looking into this stuff at this point would only help me down the line. 

I didn't quite manage to fit all the work I had to do in the 6 weeks that I had planned for this character, mainly because I didn't take into consideration that I would have days when I couldn't work at all (or do very little) because my health has not been the best lately. Still, I will start my next character next week and continue working on this one on the side. 
Main things to finish: hair cards, rig and skin, UE4 presentation