Thursday, 20 February 2020

FMP Biker -Textures 3

I made a quick test scene in Marmoset to get an idea of what the materials would look like and play a bit with the material settings. I know that this is likely to change when I put it in UE4 but I find it a little easier to try and copy the look from Marmoset at first and work my way from there for the final presentation. 


I am going to change the lighting set up as well because now it is really flat, as I just wanted to see the details on all my materials, but for the final renders, I would like to have some more dramatic lights going on. Also, the alpha map is not really displaying properly for my top piece but when I tested it in UE4, it looked much better, so I decided not to change it at the moment just for Marmoset. 


I wanted to try some new things which I didn't do for my other characters, which were doing a fuzz map for the fabrics, an SSS map for the skin, setting up the parallax effect in the eyes and adding a transitional mesh between the eyeballs and the eyelids. I think that even though those details are quite subtle, they do make a difference and give a nicer look to the materials overall.


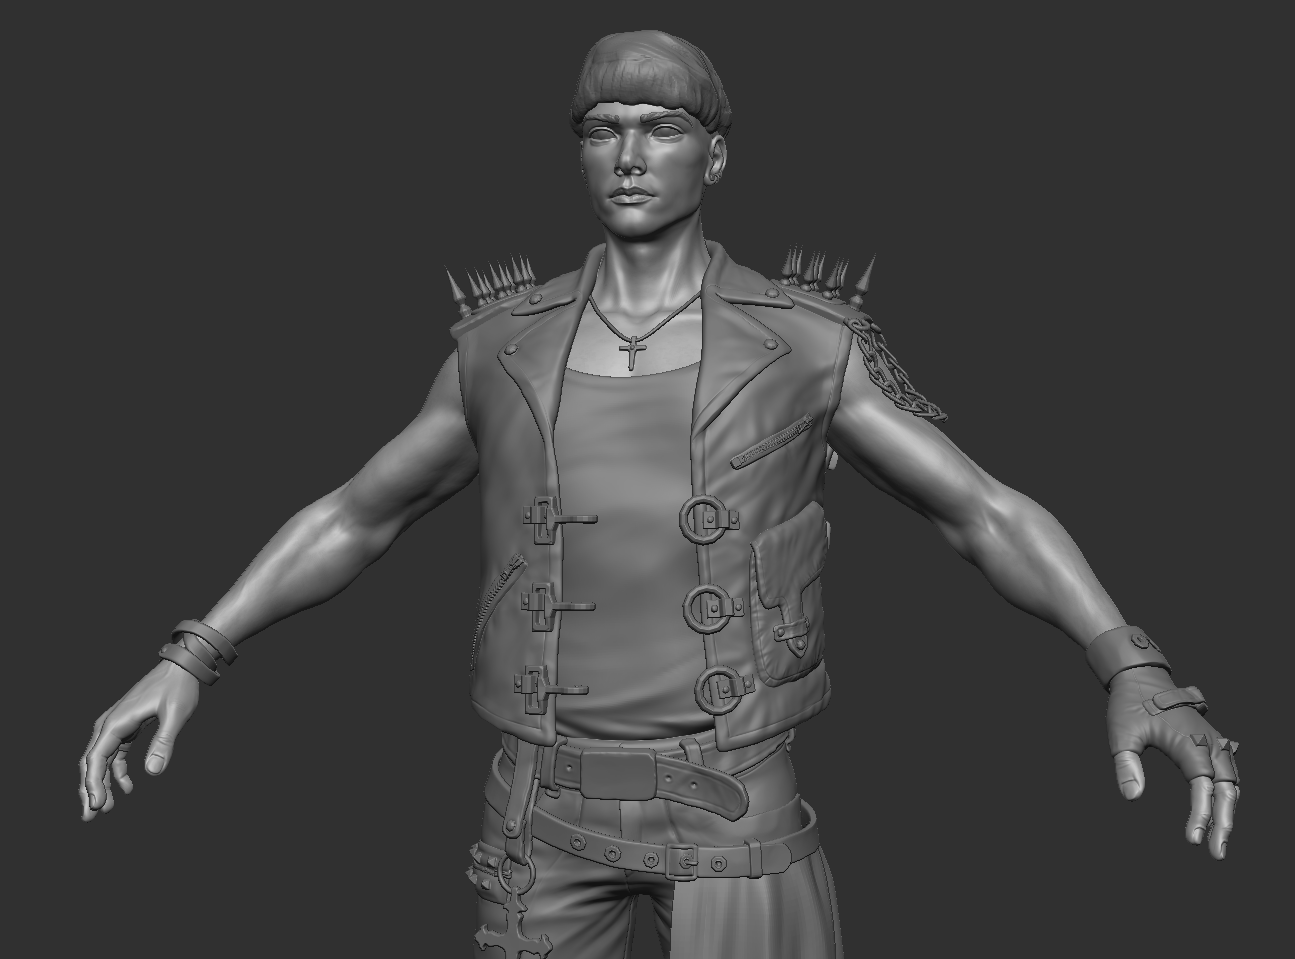
With(left) and without(right) the SSS map, eye parallax and eye transition^

After getting some very good feedback from the people from Dambusters Studios and Ubisoft, I changed some errors I failed to see until then, and also got some nice ideas for what I could do to further enhance this character. 
One of the very important things that I neglected was the size of his eyes, which was quite a bit bigger than it should have and fixing that was a nice improvement. Also, some areas needed more roughness variation so the highlights would look better and more varied,  like the skin, front of the vest and boots. Also, fixed the alphas on the fabrics to make them look a bit cleaner and more varied at the edges. I worked a bit more on the tertiary details too and that made the materials look much nicer from a closer view. The stitches needed a bit more work too, before they were only sitting on top of the clothing rather than actually going in, so I added that pressure in the fabric with a height layer. 
I still have a few more things to add to the textures, like some more edge wear and dirt in the lower part of the body, fix the colours in the tattoo and make better AO transition between the objects, but for now, I will leave it like this and come back at a later time to change those, as I am running a few days late. 
The last week that I had allocated for this character I mainly spent doing some research into UE4 shader settings and presentation and made a few tests, still got a bit more work to do before making things look presentable. Also, looked more into hair cards, how to create them with Maya xGen and place them. The hairstyle of this character is quite simple so I am not that worried about it, but my next character will have a much complex hairstyle so I feel like looking into this stuff at this point would only help me down the line. 

I didn't quite manage to fit all the work I had to do in the 6 weeks that I had planned for this character, mainly because I didn't take into consideration that I would have days when I couldn't work at all (or do very little) because my health has not been the best lately. Still, I will start my next character next week and continue working on this one on the side. 
Main things to finish: hair cards, rig and skin, UE4 presentation 

FMP Biker -Textures 2

After taking the weekend off and not taking a single look at the character, I could actually see a bit better where the problems were and what needed to change.
Firstly, I changed the colours again, the top and the scarf being the two most saturated parts, were competing witch each other for attention, so I decided to keep only the scarf saturated (because the blue was matching the pattern on the back nicely and it was keeping the cold colour palette that I wanted to have) and toned down the top to a neutral grey, then lightened it up so it would still direct the view towards the top of the character. I think this made quite a big change in the overall look of the character and it started to look better.


Also, I added the tattoo on his arm which brought a lot to the character too. I wanted to keep the religious theme with the tattoo as well and still kept it within the good fighting evil area, virtue and sin and all that. The way that I made it was by photo bashing more tattoos that I liked together in Photoshop, import the outline to Substance, find a good position on the arm and then coloured it in Substance. I wanted to keep the colouring style similar in a way to that in the painting on the back because I thought that making them look like they continue each other would be quite nice.
Also, added the scar on his chest as a way to show the connection between him and my next character. The idea was that my next character is going to be a demon, who has a contract with this character so I thought that I should show this somehow in his design as well. The symbol that I used was Leviathan's Cross (or the Satanic Cross). I actually wanted to find another symbol which would be much more subtle, but still have the same meaning, as I feel like this one is simply too obvious and well known, but unfortunately, I couldn't find anything else which was fitting but I will change it down the line if I manage to find something better. I will have the same symbols integrated somehow in the design of my next character to show their connection. 
I experimented with the positioning of the scar quite a bit, initially, I wanted to place it on his neck so it would be showing a bit under his scarf (the main purpose of the scarf in his design is to hide this sign) but it wasn't looking properly and I decided to have it on the left side of his chest. I quite liked this position better because it was sitting right next to his Christian cross and suggesting in a way the opposites that I've been playing with in his design until now ( Archangel Michael on the back of the vest and the snake in the front; Virgin Mary and Eve, Heaven and Hell, in the tattoo) and also, having it sit on top of his heart might suggest that he has been corrupted by accepting the contract with the demon (maybe?). 
Apart from this, I went over everything again and added more details and wear. I made some wear smart materials for each type of material so I could apply them to what I needed and tweak it quickly and easily.

Monday, 17 February 2020

FMP Biker - Textures 1

On the fifth week of the project, I started working on the textures. I had an idea of the materials that I wanted to have and that the colour palette was going to be mainly cold (to be contrasting with my next character, who will have a warm colour palette), but it still took a lot of experimentation before I could find something that looked well. I redid almost all of the materials at least two times, which considerably slowed down the whole texturing process but in the end, it was worth it, as I didn't want to settle for something that I wasn't completely fine with.
I tried keeping all of the materials as different as possible from each other, especially because I had more objects with the same base material (ex. more types of leather, fabrics). The way that I build them was similar to how I made the textures for the first term characters, I built them as brand new at the start and then added wear and damage to them, as well as smaller details. I wanted to have a good read on the materials from all the distances so I really tried to break everything down to primary, secondary and tertiary details and focus on only one thing at the time. Also, I switched around a lot while working on them so I wouldn't get stuck working on a single part while the others didn't have any detail.
Because I changed everything a lot of times, I made a screenshot at the end of each working day to see the progress, but there were more intermediary stages even within one day which I forgot to record.


This was the progress after the first day, at this point I was really unhappy with how everything was looking overall. I didn't like the colour palette or the material properties, things weren't working out so I decided to stop for the day and try again the following day. 


Second day, I decided to split the vest into two different materials, the normal leather and a very rough leather/suede material. I felt like having the vest completely made out of leather wasn't looking as good as expected and splitting it like this made it much more interesting, and added more variation. Also, changed the material of the top completely and I actually liked this look much more, having this type of alphas made it look more different and interesting (I was planning to add tears in the top from the beginning but the previous material wasn't looking convincing with generic tears on it).  Even though I did some more work on the other materials as well and changed the colours quite I bit, I still wasn't pleased with how the character was looking overall. 


Third-fourth days, added the glasses and scarf. I made the glasses bright yellow because I thought that it would really bring the attention to the head since everything else is quite dark and muted. After getting feedback, and trying out more colour options (of which I don't have any screenshots, unfortunately) I tried having the scarf and the top a warmer tone, and have everything else cold, so they would pop out more (which is something the main characters of DMC5 have going on, so I tried adapting it to my character).
Also, I changed the cloth on his belt back to a plain dark colour, because I felt like it needed to match in a way the rough leather material on the vest, and because the previous pattern didn't seem fitting for this type of character. For the same reason, I removed the pattern on his socks and tried compensating the variation that brought in another way, so I used some dirt stains instead of the stripe pattern. 
Going back to my leather jacket reference, I experimented a bit with having some embroidery patterns going on. I liked the variation it brought, but I still felt like that pattern wasn't really fitting for this character. 


The fifth day, changed things a bit more, I felt like my character was missing more saturated colours so I tried experimenting with that, using the main colours from the pattern I added on the back which changed things quite a bit. Relating this to the backstory of the character, I wanted to make this kind of religious paintings pattern on the back of the leather jackets the "trademark" of the demon hunting biker gang, so I had to find a painting which would somehow fit the role of my character. I ended up using "The fall of the rebel angels" by Luca Giordano, which depicts Archangel Michael defeating the fallen angels and sending them to Hell, which I thought could be fitting with my character, suggesting the role of the protector and fighter against the evil. Adding the painting gave me an idea for the embroidery on the vest too, so I changed it to a snake, which is a symbol of evil and temptation in the Bible, which would further match the backstory. Also, the snake was a more fitting pattern visually, (the first attempt was looking too feminine) but I just added it as pattern applied on top of the vest instead of an embroidery (again, because I felt it was too feminine). 
Also, I changed the material on the pants, at first I made them as denim, but I felt like that whole lower body area had too many rough materials, so I decided to change it to something which would reflect light a bit, so I changed it to waxed denim. I think that this change made quite a big difference and worked much better in the overall look of the character. 
I worked on the metals a bit more and spend some time on other parts which needed a bit more love (like the accessories). 

This was the result, after spending the entire week on the textures. At this point, I was still not happy with the colour palette and I still had to add some important bits, like the full sleeve tattoo on his arm, a scar, eye texture and none of the materials were finished, they needed more visible wear and dirt. Originally, I had planned to spend only one week on the textures, but it seems like it was not possible, but considering that this is a very important step, it's better to extend my schedule than settle for less. 


Sunday, 2 February 2020

FMP Biker -UV & Baking

As my texture budget was a 4k sheet for the entire character, I decided to split everything into 1k sheets so it would be more efficient. I tried keeping the same material on one texture sheet, so it would be easier to set up that material in engine too if I need to add any particular settings to it, without influencing everything else.
This time I did the UVs in Maya to learn how that works too, and I was quite happy with the results that I got and I feel like they are more relaxed and clean than what I usually get in 3ds Max.
For packing, I had a bit of trouble with splitting the objects into textures sheets, I tried different groups to see what works best, thinking about materials, texel density and empty spaces on the sheets. In the end, I couldn't find a way to have all the sheets perfectly packed without any empty spaces, but I thought that it was better to keep the same texel density for all and match the materials than filling every single pixel on the texture sheet. I will try packing the textures better for my next characters, but for this one, I have to move on.


This is how the texture sheets are looking now, I will still have to add 2 more, for the hair and eyes. I tried having repeated objects share the same texture spaces, the same for mirrored objects, like the belts on the back of the vest or the boots. 

This is how the objects are split ^ each colour is a different texture sheet

UV checker^

I am thinking of making the body texture sheet a bit bigger than others just so I could get a bit more details on the face and arms, but I will test how that looks in Substance and see if it won't be too obvious. 
For baking, I used Marmoset Toolbag as it usually gives me much nicer results than baking in Substance Painter. I baked each texture sheet individually and set up different baking group for all objects so I wouldn't get errors. I didn't have many problems with baking all the errors were easy to fix directly in Marmoset or a little bit of Photoshop. I baked all other maps in Marmoset too, AO map, curvature, thickness, cavity, position. 
After that, I imported all the bakes in Substance Painter, set up the scene, masked folders for all materials so now I am ready to start texturing. 


I managed to get everything set up by the end of Friday, fourth week, so now I have two weeks left for textures, hair, rig, skin and presentation. I'm not very confident that I'll be able to finish everything in time but I would prefer to take a few more days than rush the projects and mess it up. 

FMP Biker-Low Poly

I started working on the low poly on Wednesday, the third week, fortunately, I didn't have many objects to retop from scratch as most of my objects had really low subdivision levels in Zbrush and clean topology, so I only had small fixes to do. In Maya, I retoped the body, shirt, pants, cloths and vest, as I wanted to make sure they have nice topology and loops and it was easier redoing them completely than fixing the Zbrush topology. Everything else, I adjusted in 3ds Max from the lowest subdivision level. I didn't have much problem with this, probably the most challenging objects to do were the scarf and the vest. For the vest, I retoped only the inner part of it and then added a shell modifier with the right thickness which saved me quite a lot of time, instead of manually retoping both parts, and for the scarf, I went back to Marvelous Designer, changed to geometry to quads and fixed that model, which was only deleting loops and fixing edges, as MD generated some quite good loops and topology, but it was much higher than what I need so I had to change that.
For the objects which were repeated in many places, I just made one of them with proper topology and then duplicated that, as I wanted to keep the UVs the same for them as well, so I would save some texture space and could make their UVs a bit larger so I can add details (most of these objects are really small, like buttons, spikes).
As my character budget is 70k tris, I was thinking of having the body at around 60k tris so I would have 10k left for the hair, but in the end, the body tri count turned out at around 52k tris, because I deleted some small repeated objects (like bolts) where they didn't affect the silhouette and I will add them in Substance Painter. Overall, I tried keeping the same polys density so I didn't feel the need to add more to meet the 60k tris budget, as everything turned out quite even as it is.


I managed to finish the low poly by Tuesday, fourth week, which was quite nice as I had a bit more time now (1 day) to do the UVs, packing and bakes so I could start the textures the following week. 

Sunday, 26 January 2020

FMP Biker -Sculpt 3

I managed to finish the sculpt at the by Wednesday, the third week, just as I wanted. I didn't have a lot of changes to make, mostly just making adjustments. I worked a bit more on the folds of the fabrics but I didn' add any wear or damage to anything because I think it would be more efficient and easier to tweak if I did it directly in Substance Painter. Also, I was thinking of making different wear stages for the textures if I have time, for example, having a standard one, not too worn, and a really worn and beaten down one, so having wear on my sculpt wouldn't really help me with this.
I added some simple accessories, I am not completely sure if I should add more, but if I need to I'll just duplicate the ones that I already have. At this point, I have all the elements that I need in place and if I need to change anything it would be easy to reuse what I have.


I am leaving skin details, like pores, for Substance Painter as well, again because it would be quicker and easier to adjust them, and also I could add colour/roughness variation at the same time.
For the hair, I will leave it as it is for now, as it gives me the overall shapes and some direction for the hair strands, I don't think I need more to build the hair cards on top of that.


I am thinking to add more details to the jacket, something like patches or pins, but I will try that out in the textures. Also, I will add stitches and seams with the textures too. 


At this stage, I am ready to start the low poly. I only have a few objects to retop completely, as most of them I've made as low poly models from the start. Hopefully, I will be able to finish the low poly in one week, and then unwrap and pack everything in a few more days. This way, I would have 2 weeks left to do the textures, hair, rig and put it in the engine, which is still quite a bit of work but I hope I'll manage. 

Sunday, 19 January 2020

FMP Biker -Sculpt 2

Spent the start of the second week finishing the block-in, I tried to add all the remaining elements before moving on to detailing everything. I still have a few more objects to add but they are mostly small details, just accessories, so I'm leaving them for now.


After I had most of the things in place I could start going over them and sculpt the details. While doing this I was mostly looking at my references to get the shapes right, folds and other details. I tried sculpting mostly everything on layers, so it would be easy to change and I could compare how things looked before and after. 
For the objects which would be repeated in more places, I tried making the low poly first and the subdividing it and sculpting it, so I would save some time later down the line and wouldn't have to sculpt the same thing over and over (for example, the spikes, chains, belts, buckles). 
By the end of the week, I managed to get some sculpted details on everything and things were starting to look good. I still have quite a few things to add and fix, the body, head, arms and hands need more work, and the fabrics as well. I'm a bit disappointed I didn't manage to completely finish sculpting in two weeks as I planned, mainly because I was quite sick the first week. Still, I am hoping to finish the sculpt with another 2-3 days of work and save some time on the other parts of the project. I am trying not to get too stressed so soon and take my time with everything to make it look good, rather than just finish everything very quickly. 


This how the model was looking at the end of the second week, hopefully by the middle of the next week I'll be able to start working on the low poly. 

Saturday, 18 January 2020

FMP Biker -Sculpt 1

Started working on the first character for my FMP on Tuesday, the first week after the holiday, as Monday was mostly spent handing in the first term projects. I spent some time during the holidays gathering references for my characters so I knew quite well what I wanted to do with this one. I didn't do some proper concepts for it, only some simple sketches in which I mixed outfits from my references, just to visualise the character a bit better. In terms of clothing style, the main idea for the character was to make him quite punk, biker looking but also show somehow the fact that he is religious, which I thought would make an interesting contrast for the character and also with my other character, who should be a demon. One of my main goals for these characters is to show their personalities through their designs and tell a story with everything, so I am trying to keep this in mind when making decisions on their design. What I was looking for when gathering references were mainly things that looked interesting visually, would match together and the idea of my character and would be difficult to make, as I want to push myself and do more complex models which would also be functional, just as in the real world. Also, I want to present my character in two ways at the end, one with the scarf and sunglasses and one without those, so I am trying to make it look good in both ways.


I started with a body block in to get the proportions right and then exported that to Marvelous Designer to start making the clothes. I only used Marvelous for the vest and scarf, and everything else I did directly in Zbrush, except the boots, glasses, buckles, and some belts which I made in 3dsMax because I wanted to get some clean bases to work on. In Zbrush, I made everything in a similar way as I did with my previous characters, mainly extracting shapes, cleaning their topology and moving them in place, or just inserted primitives to work from. I used Zmodeler quite a lot this time to clean the geometry because I wanted to start from clean, low poly bases for everything. I hope this will help me save some time with the retopology as well. 
This first week was mostly spent only working on the block-in, as I had a bit of trouble getting back to speed after the holidays, especially because I was sick the entire week and couldn't concentrate very well. Also, I wanted to take my time with everything so I would have a good start, rather than rushing and having to do a lot of fixing later on. 


This is everything that I managed to do in the first week, there is still a lot more stuff to add and fix but I hope I can finish everything in the next week, as I planned to spend 2 weeks on the sculpt. 


Sunday, 5 January 2020

Hidatsa Character -Update

Applying the feedback that I got for this project, I went back and packaged the textures a bit better, so I had the metalness and roughness map in one texture. Also, I checked the textures again and made some slight tweaks, especially for the hair. I changed the material settings for the hair in Marmoset, and worked a bit more on the texture for the hair strands and made the more subtle, as I thought that they were too obvious and I wanted them to blend in the hair mesh, rather than stand out on top of it. I made some slight changes to the lighting as well, toned down the colours and the intensity a little bit and changed some angles.
Overall, I am quite pleased with this character and I feel like I managed to improve a little bit from my previous one, but for the FMP I need to take a bigger step forward and improve all parts of the process, the sculpt, retopology, texture, hair and presentation.


SO Character -Update

The first thing I did after the formative hand in was to finish the rig and pose the character. In the end, I used 3ds Max to do the rig because I am more used to the tools in there and I would need to learn a bit more before doing it in Maya as well as I would in Max.
After getting the feedback, I went back and made a few changes to the character to take it a bit further. Firstly, I changed the white pattern on the T-shirt, I took the old one to Photoshop and hand-painted on top of it to make it look crisper and higher res to match the rest of the character. Also, I added more wear to the clothing, added some discoloured stains and a few clumps to the T-shirt and the pants. For the coat, I added larger, more visible slashes and more dirt, especially in the lower part of it. For the rest, I just checked everything again and only made very subtle changes.
In Marmoset, I changed the material settings for the hair as the light was reflecting a bit weird in some areas, mainly because of the SSS settings. I didn't make a lot of changes to the lighting, just toned down some of the lights and adjusted the others. Also, I added a very simple backdrop so the background wouldn't just be a flat colour. Initially, I planned to add some kind of smoke alpha to the sword (as it had in the concept) but gave up on the idea because the sword is bright enough as it is and another emissive surface in that area would draw the attention too much from the character.


Helmeted Character -Update

After getting the formative feedback and carefully reading it, I made some changes based on it to improve the character. Firstly, I changed the scarf texture completely, I kept the same pattern on it but worked on the wear of the cloth more to try and make it more believable (changed the fabric texture, added clumps, stains with colour and roughness variation). Also, made the wear on the other materials more visible from a distance, changed the wear on the skin to a few big slashes, rather than more smaller ones. I changed the values and saturation of the colours a bit as well, made the red gradient on the legs and arms stronger, changed the base colour of the scarf to a desaturated purple/pink (from brown) and made the pink edges on her top more saturated. I tried to change the overall roughness of the different body parts to make them stand out more from each other. Worked a bit more on the belts and pouch, added more details and wear to make them a little more interesting, and changed their base colour too. Also, I spent some more time working on the AO map to try and make the transition between the materials and body parts nicer.
In Marmoset, I changed the lighting setup completely as I thought it wasn't working that well for my character as it previously was. I added a simple backdrop to frame the character from the background better and more butterflies because I wanted to use their emission to bring out some reflections in the metal parts.